- On any phone that follows Google’s core Android interface, simply turn off the toggle next to “Use auto-rotate” within the Display section of the system settings.
- On a Samsung phone, the feature curiously isn’t present at all in the system settings — but you can find a toggle for it in the Quick Settings area that comes up when you swipe down twice from the top of your phone. Look for the icon labeled “Auto rotate” and tap it once to disable it (which will change its title to “Portrait,” somewhat confusingly — but that’ll do the trick).
From there on out, anytime you rotate your device, it won’t automatically change the screen’s orientation and will instead place a small icon in the corner of the screen. You can then tap that icon to change the rotation or ignore it to leave it as-is.
Android problem #8: Tiny text
Stop squinting, would ya? If the words on your phone are too damn small, head into the Accessibility section of your system settings and try out two options: “Font size,” which will increase text all throughout your phone, and “Display size” or “Screen zoom,” which will increase the size of everything on your screen.
On a Pixel phone or another device that follows Google’s standard Android interface, both options will be within the “Display size and text” area of the system accessibility settings. On Samsung devices, you’ll need to tap “Vision enhancements” and then select either “Font size and style” or “Screen zoom” to make the two adjustments.
Android problem #9: Annoying notifications
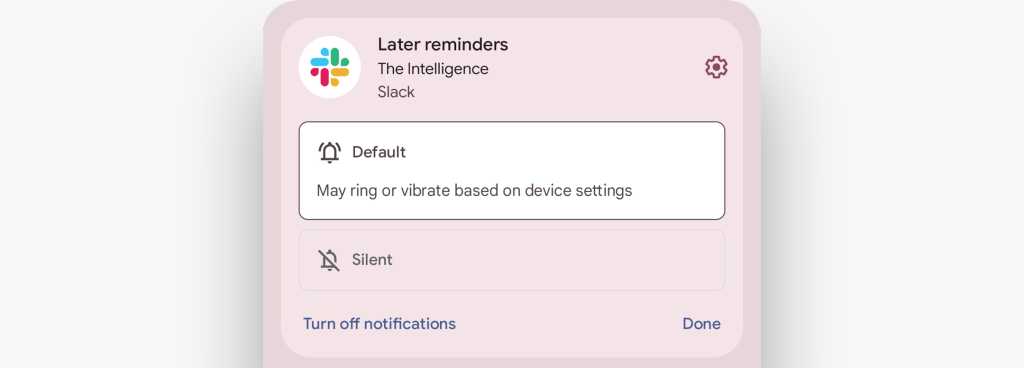
Whether it’s an overly aggressive app or, ahem, an overly aggressive texter, stop notification nuisances at their source by pressing and holding your finger to the next unwanted alert that pops up. That’ll pull up a control panel of sorts that lets you turn off the associated type of notification entirely — or just silence it so that it still shows up but doesn’t actively demand your attention.

Less annoying notifications are always just a long-press and a tap away.
JR Raphael / IDG
And if you’re really feeling crafty, you can create powerful filters for your Android notifications to customize and control exactly how different types of alerts behave — and even, if you’re so inclined, to summarize similar notifications and make your list of pending items less overwhelming.
It’s 2024, for cryin’ out loud. Your contacts shouldn’t be accessible only on your phone — and you shouldn’t have to jump through hoops to “transfer” them from one device to another.
If you’re using a phone made by anyone other than Google, go into its Contacts app and make sure it’s set to sync your info with your Google account — not with the manufacturer’s own proprietary syncing service.
This is particularly pertinent for Samsung owners, as the company tends to sync contacts with its own self-contained service by default. That’s fine if you only want to access that info from that one phone and if you plan to purchase only phones made by Samsung in the future — eternally — but in any other scenario, that setup is not going to serve you well.
Once you make this change, your contacts will be synced with Google Contacts — which means they’ll always be immediately available within the Google Contacts website on any computer where you’re signed in and on any phone where you install the Google Contacts Android app.
Android problem #11: Call-ending challenges
Ever find yourself scrambling to end a call — but then your screen won’t come back on fast enough? Or maybe the screen comes on, but the command to hang up isn’t right there and ready?
An Android accessibility option can make your life infinitely easier by empowering you to press your phone’s physical power button anytime you’re ready to say goodbye. No need to hunt around for the right icon or even look down at your phone at all — just one button press along the device’s edge, and the person on the other end will be gone (thank goodness!).
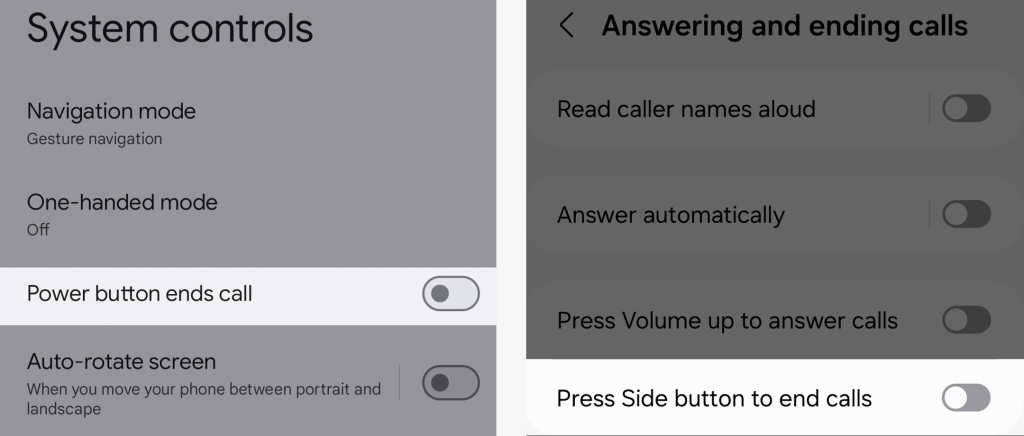
All you’ve gotta do is look for the “Power button ends call” option in the Accessibility section of your system settings. On Pixel phones and other devices that follow Google’s standard Android interface, it’ll be within a “System controls” submenu in that area. On Samsung products, you’ll have to tap “Interaction and dexterity” and then “Answering and ending calls” to find it — and it’ll be labeled “Press Side button to end calls” (even though the “Side button” is more often than not actually just the power button).

If you dig around enough in Android’s settings — on a Pixel phone, at left, and a Samsung device, at right — you can find a switch that’ll make it much easier to end a call.
JR Raphael / IDG
However you get there, flip that switch on — and get ready to get off a call more easily than ever.
Android problem #12: A frozen phone
One of the most frustrating Android problems of all is having a phone that’s either stuck on some process and not responding or stuck in a powered-off state and refusing to turn on. But no matter how dire things may seem, there’s almost certainly always a solution.
The simplest one is a hard reboot: Depending on your device, you’ll want to press and hold either the power button by itself for 30 seconds to a minute — or press and hold the power button and either volume-down or volume-up button together for that same amount of time (or until you feel a vibration and see something show up on the screen). If you see a strange-looking menu that says “Start” and has a picture of an Android robot, don’t worry: Just press the power button again, and your phone should boot up normally.
If nothing happens with either of those processes, try leaving your phone plugged in for a solid few hours, just to make sure the battery isn’t depleted. Then try again.
If things still aren’t coming up — and if you aren’t seeing even the standard battery indicator graphic appear on the display when you plug the phone in — well, my friend, it’s time to make your way to our final Android issue.
Android problem #13: A non-charging phone
Last but not least is the problem to end all Android problems: an Android phone that simply won’t charge (and thus also won’t power up, once its battery has been run all the way down). I’ve been there. And while it’s certainly possible that you could be facing some sort of hardware-related defect, it’s also quite likely that this is something you can fix in a jiff.
So try this: Take something like a toothpick or the end of a paper clip and very carefully and very gently dig around a little in the phone’s charging port to clear out any lint or debris that’s built up in there. It sounds crazy, I know, but sometimes, enough gunk gets collected in that area that the power cable isn’t able to establish a good connection and charge the device (or charge it consistently, without the connection coming in and out and making it difficult for much charging to happen).
Once you’ve cleared out a good amount of gunk, plug the phone in again and see if something happens. If the battery was totally dead, you might have to leave it plugged in for a while before you see any results. But there’s a decent chance this will work — and then, in a matter of minutes, you’ll be back in business.
Sometimes, the simplest fix is the most satisfying one of all.
This article was originally published in August 2020 and updated in July 2024.


