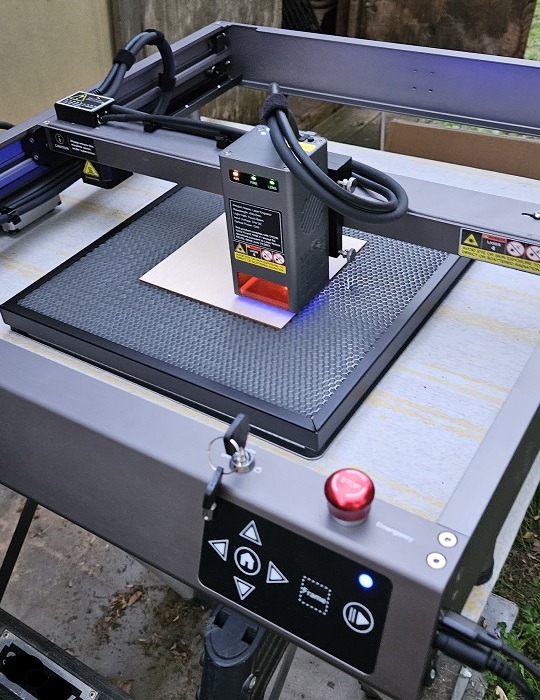
From personalized gifts to handcrafted ornaments, laser engraved and cut items are unique and beautiful. The Creality Falcon2 22W Laser Engraver and Cutter lets you quickly add personal touches to a variety of materials and make your own laser cut crafts at home. I recently had the opportunity to try this powerful machine for this review.
This is a sponsored article and was made possible by Creality. The actual contents and opinions are the sole views of the author, who maintains editorial independence even when a post is sponsored.
Overview of Features
The Creality Falcon2 22W Laser Engraver and Cutter has so many features that it’s hard to know where to start. The 22W laser is an obvious benefit and helps you cut through up to 15mm wood or up to 0.05mm stainless steel in just a single pass. Plus, it’s ultra-fast, working up to 25,000mm/min.

The laser is made up of four 6W laser diodes that are compressed using FAC spot compression. This gives you 22W overall power.
Safety is a top priority with the Creality Falcon2. It features five safety protections, including:
- Emergency stop button
- Security lock
- Active stop function
- Bidirectional limit switch
- Protective laser cover (safety glasses are also included)
In addition to these features, there’s a triple monitoring system that keeps track of any issues with the air assist, lens, and fire. If a flame is detected, you’ll hear an alarm instantly, and the machine stops. For the lens, you’ll receive an alarm when the lens is dirty to prevent lens damage and breakage.

Avoid scorching your designs with the integrated Air Assist. Not only can you manually adjust it as needed, but if you’re using LightBurn software, you can choose your air settings in the software.
Speaking of LightBurn, the Falcon2 is compatible with LightBurn, LaserGRBL, and other laser cutting/engraving tools. However, instructions are included to use the two mentioned tools. You can also connect the laser engraver directly to your computer via a USB cable or save project files to a microSD card to insert into the machine.
Using a microSD lets you work offline. The Offline Dynamic Preview feature gives you the power to fine-tune positions a millimeter at a time.

The aluminum alloy design is incredibly stable. U-shaped, wear-resistant wheels, along with a sliding rail, ensure smooth motion throughout your project, ensuring that no weird vibrations will mess up your designs.
Finally, if you’re engraving stainless steel, add some color to your project. This is a new feature for Creality. As the metal is heated, the metal reacts, causing hundreds of colors to appear.
Unboxing the Creality Falcon2 22W Laser Engraver and Cutter
I immediately fell in love with the Creality Falcon2 22W Laser Engraver and Cutter out of the box. It was almost completely assembled. It’s only three steps from unboxing to fully assembled.

The Falcon2 comes with everything you need to get started, including:
- Machine frame
- Laser module
- Air assist module
- Power supply
- 2 sets of raiser stands (for different heights)
- USB cable (USB-A to USB-C) and USB-A to USB-C adapter
- Safety goggles
- Anti-static brush
- Safety key
- Measuring block
- SD card reader
- Metal protection plate for engraving
- Basswood board, stainless steel square, felt squares, and paper squares for initial projects
- Tweezers
- Dust-free cloth
- Protective lens
- Wrench, Allen wrenches, and screws
- Cable straps
- Small plastic storage box with all smaller accessories in it

For cutting, you’ll need a cutting mat, such as a honeycomb mat. While Creality provided one for my tests, it’s not included with the laser engraver.
Getting Started
Did I mention assembly is quick? I had to attach the laser module to the frame, hook up the Air Assist module, and set my leg height. That’s it! That means more time to use the machine.
The included microSD card (which is inside the USB card reader) includes full details on the assembly, using the sample project files with LaserGRBL and LightBurn, and the machine file you’ll need to use the Creality Falcon2 22W Laser Engraver and Cutter with LightBurn.

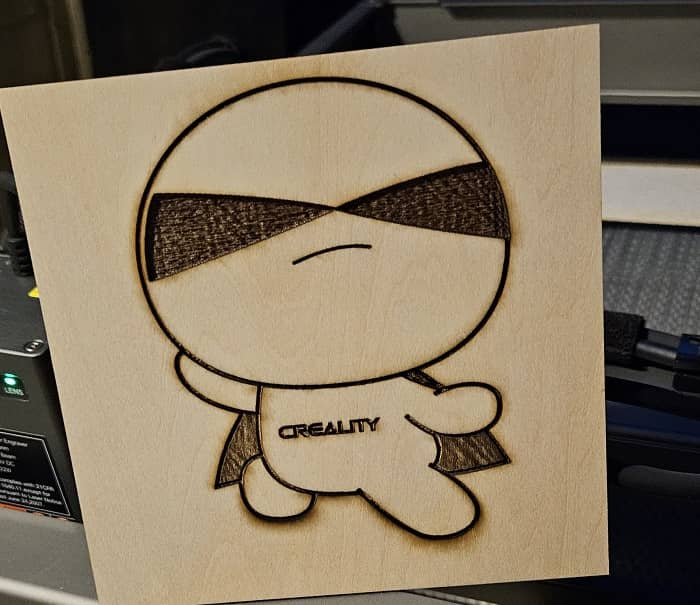
I started my test by connecting directly to my computer with the included cable. I followed the instructional video to set up a project with LaserGRBL first. This is a Cura superhero. I set it just to engrave versus engrave and cut.
From unboxing to setting up the first project, it took about 15 minutes. There’s a lot to unbox, as you can tell from the list above.

I set up the metal plate and honeycomb cutting board and started the project. I was amazed at just how fast this machine is. I had previously used Creality’s 10W laser engraver, which worked incredibly well. However, I could tell how much faster the 22W engraver and cutter works.

It only took around six minutes to engrave the superhero. This included not just engraving lines, but filling in deeper sections for the mask.
Cutting With the Creality Falcon2
The next step was testing the cutting feature. This time I used LightBurn. While it’s not free software, you can get a 30-day full-featured free trial, with no credit card required.

The test project was an intricate eagle. I followed the video to get the settings exactly right. There’s a chart of recommended power and speed settings on the included microSD card.
The eagle was perfectly cut out in less than 10 minutes. I was able to lift just the eagle cut out without a single piece of wood sticking to it. Not only were the cuts precise, but there wasn’t a sign of any scorching, thanks to the Air Assist module.

I also cut out a simple heart-shaped puzzle. I wanted to see how well the pieces would go back in place. I wish I’d engraved an image on the puzzle before cutting it, but I had a perfectly cut heart frame and a set of pieces in about 10 minutes. The pieces went together just as well as any puzzle you’d buy in a store.

I also tried using thicker pieces of wood. My first test was with 1/2 in. (12 mm) plywood. I went by the suggested parameters Creality provides on the SD card, but it took several passes before the full pattern cut through. I think it’ll take some playing around with settings to get the right speed/power combo to do it all in a single pass. However, there were some areas fully cut through during the first pass.

I also gave 1/4 in. lauan a go. Personally, I think I had the laser position a little too close, so I had a little scorching on the edges, but I had a much cleaner cut in a few passes than I did with the thicker board. Once again, I feel like this is just a matter of getting my settings just right for different types of wood. However, the end result looked great!
My final test was the “magical color engraving.” Creality provided a beautiful butterfly for me to try. For metal, the process is much slower to give the laser time to heat the metal to achieve the desired color. Trust me, the wait is well worth it. The design below took just over six hours.

Not only are there five colors mixed in here, but the inner part of the wings is actually engraved to add more depth. The Creality Falcon2 22W Laser Engraver and Cutter really opens up a lot of possibilities with this feature.
Final Thoughts

The Creality Falcon2 22W Laser Engraver and Cutter is ideal for beginner hobbyists and even professionals. It’s incredibly fast and precise with a variety of built-in safety features. It’s also reasonably priced at just $1,199. You can pick up your own Falcon2 directly from Creality and use the code FALCON50 for a discount. You can also take advantage of the anniversary sale to get the Falcon2 for just $899.
Subscribe to our newsletter!
Our latest tutorials delivered straight to your inbox


