Cloning a PC drive comes in handy for a variety of reasons, but primarily when you want to replace one drive on a PC with another that is either bigger or faster than the original drive, if not both.
Such a cloning operation becomes critical on Windows PCs when the drive to be replaced is the boot/system drive, meaning it contains the files used to boot up the machine when it’s starting up or restarting, as well the operating system files used to run Windows itself. It’s critical because its proper outcome is a machine that boots and runs when that operation is complete, the old drive removed, and the new drive put in its place.
About disk cloning, a.k.a. drive cloning
Disk cloning, now often called drive cloning, means creating a true and faithful copy of one computer storage device on another — in other words, copying the contents of one storage device onto another storage device. The original name comes from a time when this meant spinning hard disks. But today, with solid-state drives (SSDs) as common as hard disks (HDs), both source and target can be either an HD or an SSD. In fact, it’s often the case when a boot/system disk is being cloned that the source is an HD and the target an SSD because of the improved performance that such a changeover invariably delivers.
That said, the terms “disk cloning” and “drive cloning” are used more or less interchangeably. The older nomenclature persists in terms like “disk image,” and you may see drive cloning software refer to all storage devices as “disks,” even if they’re SSDs.
What is drive cloning good for?
In workplace practice, drive cloning supports multiple valuable uses, including the following:
- Storage device upgrade: Moving the contents of an older drive to a newer one, usually for improved performance, increased capacity, or both.
- Full system backup: Cloning one drive to an identical device creates an easy, drop-in replacement for the original if it becomes damaged, corrupted, or otherwise unusable.
- System wipe and restore: Sometimes, it makes sense simply to blow away the contents of a drive and replace it with a pristine, clean copy of the OS and applications. This is a common technique for completely removing virus or malware infections, for example. Here, the image created to make a clone is actually used to rebuild the original drive.
- Provisioning new computers: This is how computer makers like Acer, Dell, HP, and others send desktop, notebook, and tablet PCs out the door. A high-speed cloning setup cranks out copies of a reference image for the target PC on individual drives that, when inserted into a PC, are ready to be turned on and run for their new owners.
- Passing a computer to another user: By restoring an image created before a user logs into the system for the first time, a computer can be restored to its factory default (or first boot-up) state. This is a preferred method for preparing a machine for sale, or to pass it from one user to another.
How to clone a drive in Windows 10 or 11
A cloning operation usually proceeds in one of two ways:
- Files are copied from the source disk directly to the target disk.
- The contents of the source disk get written into an image file, and that image file is then used to write those contents to the target disk.
Though the second approach takes a bit longer and requires special software, it has become the preferred approach to drive cloning for a variety of reasons. First among these is that so long as the disk image is available, problems with the target drive (or the systems involved in writing to that drive) won’t prevent the cloning operation from completing (as soon as issues in writing to the target get resolved).
Thus, the overall process I’ll cover in this story is to create an image of the drive to be cloned, and then restore that image to a different drive. Though there are countless options for this task (and most good backup programs, such as Acronis, ToDo and AOMEI Backupper, can also clone drives), I recommend using one of two tools for drive cloning in Windows 10 or 11:
- MiniTool Partition Wizard (Pro or better): The freeware version of this well-known and widely used partition and disk management tool won’t clone drives. A US$59 annual Pro license (or US$159 lifetime perpetual license) is required to use its “Copy Disk Wizard” feature. (Other license options support up to 299 devices.) This makes it dead simple to clone a drive. It will also install an image backup tool (namely, MiniTool ShadowMaker) unless you opt out. Watch the install options carefully for this and other potential gotchas.
- Clonezilla Live: This free and open-source software package supports bare-metal backup and recovery, as well as partition management, plus disk imaging and cloning capabilities. The Live version is intended for single-machine backup, restore, imaging, and cloning. Another version, Clonezilla SE (Server Edition) is for larger-scale deployments and operations. Clonezilla saves and restores only used disk blocks, so it also works surprisingly quickly.
Working with MiniTool Partition Wizard
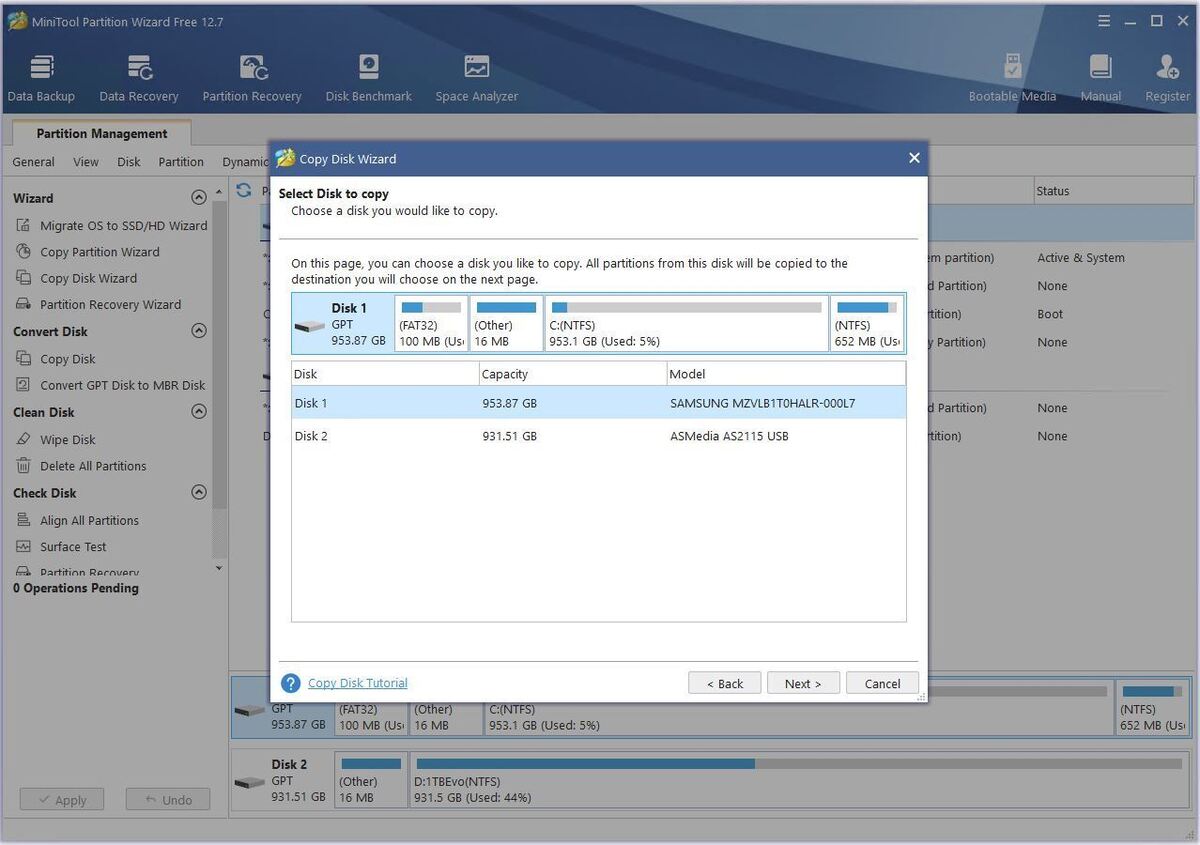
Starting a drive cloning operation in MiniTool Partition Wizard (MTPW) is as simple as firing up the application, choosing Copy Disk Wizard in the left-hand menu (see Figure 1 background left), selecting a source drive, and clicking Next.
 Ed Tittel / IDG
Figure 1: By default, MTPW picks Disk 1 as the source. On most desktops and laptops, this should be the system/boot drive as shown here. Note that Drive C appears third from left. (Click image to enlarge it.)
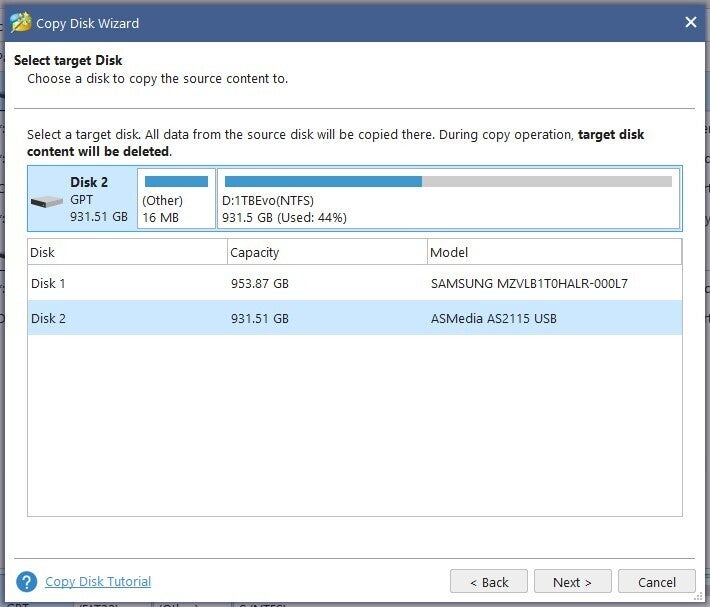
Next, of course, one must click a destination drive. For this example, I used an external, USB-attached 1TB Samsung EVO M.2 SSD device I keep around for testing purposes. Figure 2 shows the Copy Disk Wizard window with Disk 2 (the target drive) selected.
 Ed Tittel / IDG
Figure 2: Because there are only two drives on the test PC, Disk 2 shows up as the disk clone target.
On systems with three or more drives, you’ll have to select your target explicitly. Once you do so and click Next, a Warning window appears, as shown in Figure 3. DO NOT PROCEED unless you’re ready to lose the contents of the target drive as it currently exists.
 Ed Tittel / IDG
Figure 3: Once you click Yes to proceed, the target drive’s prior contents will be destroyed.
Next, you’ll be asked to fit or resize partitions on the target disk. In most cases, that won’t be necessary. Click Next to keep going.
You may also be warned to “change BIOS mode to UEFI” — this will only be necessary on older PCs or laptops; devices from 2017 or newer are almost certain to run the Unified Extensible Firmware Interface (UEFI) already.
Click Finish to fully commit your drive clone from source to target. This is the point of no return; you can still click Cancel at this stage to forgo the drive changes that will otherwise occur. Once you click Finish, you’ll wind up with a perfect copy of your original source drive in the target’s place.
If both devices are the same kind (NVMe M.2 SSD, for example), you can open up the PC, remove the source device and plug in the target device, then boot your PC from that device.
Note: If you buy a license for MTPW, I recommend the Pro Ultimate license for a one-time fee of US$159. It covers as many as five PCs and includes excellent data recovery capabilities in addition to disk and partition management and repair. I’ve used the tool to good effect for a decade or more now. It pays itself off in under three years for a single PC annual subscription and covers multiple admin PCs.
Working with Clonezilla Live
Using Clonezilla Live means leaving the Windows environment to run the program. It operates within its own runtime environment, which is based on Linux and operates inside a character mode interface.
Clonezilla will let you clone one drive directly to another without writing an image in between (or it will first write an image, then copy that image to the target drive). Geekyprojects.com offers a good tutorial on how to use the software to clone a drive: It’s entitled “How to Use Clonezilla” and is worth consulting. Other good references include Richard Lloyd’s YouTube tutorial entitled “Clonezilla Disk Imaging and Cloning Utility Live USB Boot Disk Tutorial” and Clonezilla’s own step-by-step instructions entitled “Disk to disk clone.”
The process takes about 15 steps to complete and is straightforward, especially if you can follow along with one of the preceding resources on another screen. Clonezilla Live runs at least one-third (33%) faster than MTPW on the same source and target drives. I took a shortcut by taking a bootable USB drive built by the Microsoft Media Creation tool, deleting all files, and then copying the contents of the Clonezilla Live .ZIP archive onto that drive. Popped it into the target PC, rebooted, and targeted that USB for boot-up. Worked like a charm.
Here’s an overview of the steps for direct drive-to-drive cloning:
- Select Language (comes up en-US by default). Hit Enter.
- Select Keyboard layout (comes up US by default). Hit Enter.
- Start Clonezilla (comes up by default). Hit Enter.
- Drive clone menu (comes up device-image by default, as shown in Figure 4). Select device-device, hit Enter.
 Ed Tittel / IDG
Figure 4: Choose “device-device” for direct drive cloning.
- Accept default cloning option (Beginner mode). Hit Enter.
- Accept default (disk_to_local_disk). Hit Enter.
- Choose local disk as source (choose your source disk). It shows up as nvme01 on my test laptop. You should see something similar for your system/boot drive early in the list (usually first). Select that, hit Enter.
- Select target disk (choose a different disk from the source). It shows up as sdb and SABRENT_External on my test laptop. You should see whatever drive you’ve plugged into USB as your target. Select that, hit Enter.
- Check repair options. Default (skip check/repair) should be OK. Hit Enter.
- Partition table options. Default (Use source disk partition table). Hit Enter.
- PC completion option. Choose Reboot option from menu. Hit Enter.
The one-line command alternative is displayed at the bottom of the screen as the cloning gets underway:
/usr/sbin/ocs-onthefly -g auto -e1 auto -e2 r -j2 -sfsck -k0 -p reboot -f nvme01 -d sdb
At some point, you’ll be prompted, “Press ‘Enter’ to continue…” Do so. After additional checks, you’ll hit the point of no return and get a warning in all caps that the data is about to be destroyed. Go ahead, do it: enter y (twice). Then the actual cloning gets underway. Upon completion, you should have a replacement for the original target disk.
Good stuff!
A UEFI/Secure Boot wrinkle?
Occasionally, on some computers that boot using UEFI, cloning boot/system drives can go awry. Such a situation will make itself immediately apparent when you try to boot from the destination disk and get a message that reads something like “Unable to boot” or “Unable to find operating system.” If this happens to you, you may need to try a different approach. Start by disabling Secure Boot (see Microsoft’s instructions for doing so in Windows 10 and in Windows 11), and try again. This will often do the trick.
Otherwise, technically savvy readers can turn to the Windows command-line boot repair utilities bootrec and bcdboot, or to third-party tools such as EasyBCD ($40), to attempt such repairs. Ultimately, the result should be a bootable, cloned boot/system disk.
This article was originally published in February 2017 and updated in July 2023.
Copyright © 2023 IDG Communications, Inc.
