If your Apple Watch 9 is suffering from abnormal battery drain, here are the steps to take before contacting Apple support or taking your device into an Apple Store.
Battery drain can impact all versions of the Apple Watch, even newer models like the Apple Watch 9. In most cases, it’s a software issue. In rare cases, the rapid drain is caused by faulty hardware.
If you think your Apple Watch 9’s actual battery is at fault, you’ll need to get in touch with Apple. Your device is under warranty and if the company determines it’s a hardware issue, they should issue you a new one.
With that out of the way, here are ways to quickly fix bad Apple Watch 9 battery drain.
Restart Your Watch
First, try restarting your device. Power it down, wait a minute or two, and then power it back on and see if battery life improves.
If the drain is really bad, you might try a force restart/hard reset. If you don’t know how to do that, please check out our walkthrough.
Update Your Watch
Next, make sure your Apple Watch 9’s running the latest version of watchOS 10.
If your device is currently running software older than watchOS 10.1.1, you should upgrade immediately. Apple says watchOS 10.1.1 provided important bug fixes and it addresses an issue that could cause the battery to drain more quickly for some users.
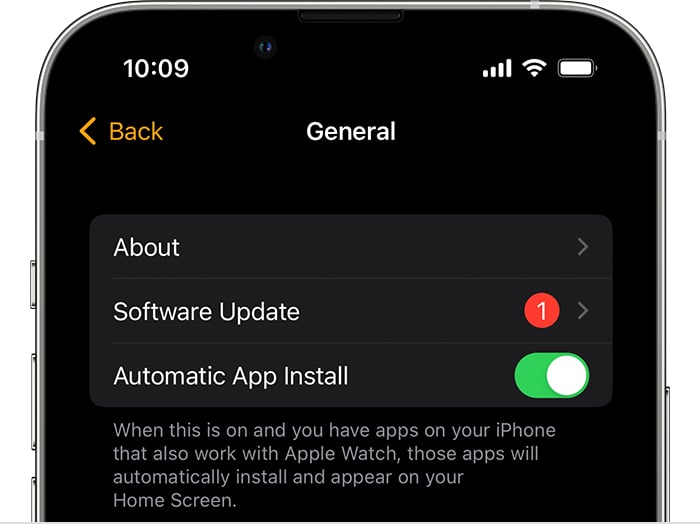
Update Your Apps
Make sure you keep your applications up-to-date to prevent rapid battery drain.
To do this, ensure your device is set to automatically download updates. Here’s how to check if this function is turned on on your watch:
On Apple Watch
- Open the Settings app on your Watch
- Scroll down and tap App Store
- Make sure Automatic Updates is toggled on
On iPhone
- Open up the Watch app on your iPhone
- Scroll down and tap App Store
- Make sure Automatic Updates is toggled on
Manage the Display
It’s important to manage your Apple Watch 9’s display. The more it’s in use, the more battery life it will drain. Here’s how to get a handle on it.
First, make sure the display is at an appropriate level of brightness for the environment you’re in. To adjust your Apple Watch 9’s screen brightness, follow these steps:
- Open the Settings app on your Watch
- Tap Display & Brightness
- Use the slider at the top to adjust the brightness of the display
If you’d prefer to adjust the brightness from your iPhone, here’s how to do it that way:
- Open up the Watch app on your iPhone
- Tap General
- Tap Display & Brightness
- Use the slider at the top to adjust the brightness of your Watch display
If you don’t need the watch’s screen to turn on every time you move your wrist, try turning off the “Wake On Wrist Raise” function. You may also want to shut the device’s Always On display feature off to conserve battery.
Use Low Power Mode
Your Apple Watch 9 feature called Low Power Mode and it helps preserve battery life by limiting sensors and Wi-Fi connectivity. It’s useful in a pinch though you can leave it turned on if you’re noticing rapid battery loss.

On Apple Watch
- Open up the Settings app
- Scroll down and tap on Workout
- Toggle Low Power Mode on
On iPhone
- Open up the Watch app on your iPhone
- Scroll down and tap Workout
- Toggle Low Power Mode on
Turn Off Background App Refresh
Apple’s Background App Refresh feature keeps apps data fresh in the background. It can also chew through your device’s battery life. If you don’t need it, turn it off.
On Apple Watch
- Open up the Settings app
- Tap General
- Tap Background App Refresh
- Toggle Background App Refresh off
On iPhone
- Open up the Watch app on your iPhone
- Tap General
- Tap Background App Refresh
- Toggle Background App Refresh off
Unpair Your Apple Watch 9
If none of these fixes work, and you can’t find any other remedies, you can try unpairing your Apple Watch 9 from your iPhone. This process is fairly involved and it should only be used as a last resort.
If you want to go through with it, you’ll want to check out Apple’s detailed guide for more.
4 Reasons Not to Install iOS 17.1.1 & 11 Reasons You Should
Install iOS 17.1.1 for Better Security |
|
 |
|
|
If security is important to you, and you missed older versions of iOS 17, think about installing Apple’s iOS 17.1.1 update right away. iOS 17.1.1 doesn’t have any known security patches on board. However, if you skipped an older version of iOS, you’ll get fixes from the updates you missed when you upgrade. iOS 17.1 brought 18 security fixes to iPhone. It addressed issues within Weather, Status Bar, WebKit, and more. iOS 17.0.3 brought two patches for two security issues Apple identified within the software. If you want to read about the patches, head here. iOS 17.0.1 delivered three important patches to iPhone. If you’re interested in the exact nature of these improvements, you can read about them over on Apple’s security website. As for iOS 17 itself, it brought 40+ new security patches with it. A staggering number to say the least. If you want to learn more about them, head over to Apple. In addition to those patches, iOS 17 brings some additional enhancements to privacy and security including improvements to Communication Safety beyond Messages. It now includes content sent by AirDrop, Contact Posters in the Phone app, FaceTime, and the systemwide photo picker. You now have an option to blur out sensitive photos and videos before you choose to view them. There’s also an expanded Lockdown Mode which will help protect you against cyber attacks. Apple’s also improved sharing permissions and you now have more control over what you share with the apps on your device. The company also notes that starting in iOS 17, Voice Memos encrypts the titles of recordings stored in iCloud, in addition to the recordings themselves. If you skipped older versions of iOS, you’ll get the security patches from those updates with your iOS 17.1.1 update as well. |
|