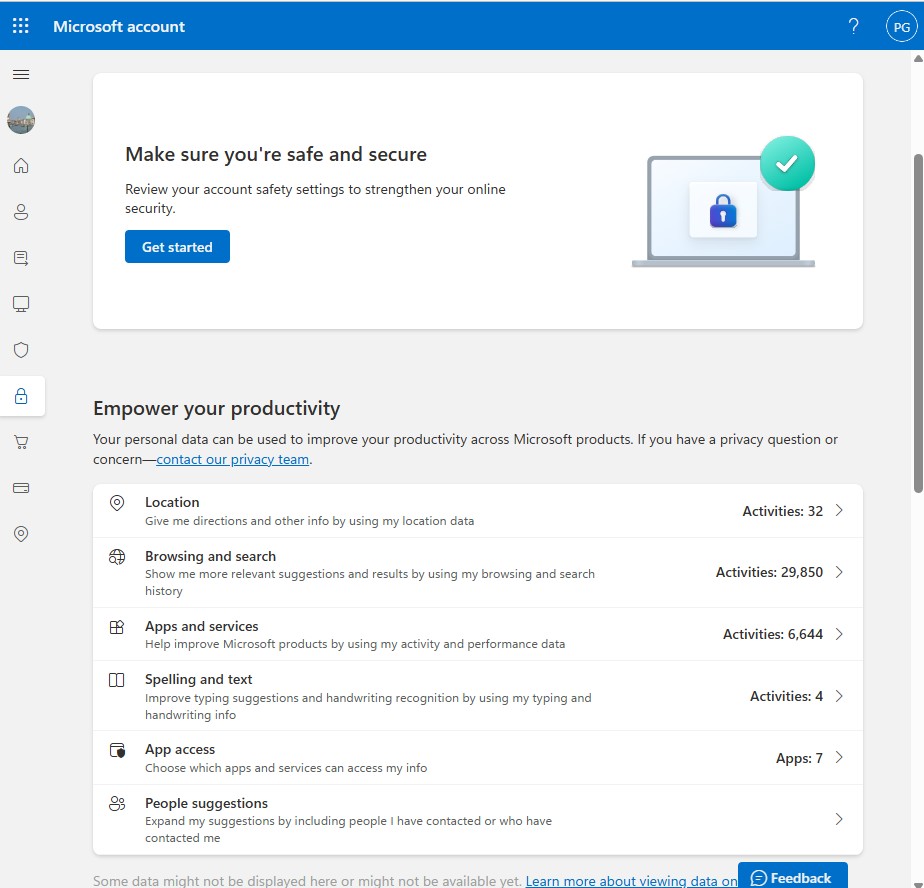
(Note that for your browsing and search history, it only tracks your activity when you use Microsoft Edge or Internet Explorer. It doesn’t track data when you use other browsers, like Chrome or Firefox. And it only tracks your location history when you’re using Microsoft devices, not those that use iOS or Android.)

Microsoft’s little-known Privacy Dashboard is a great place to delete much of the information Microsoft gathers about you.
IDG
To use it, head to the information you want to view and clear, then click the appropriate link — for example, to view and delete your browser history in Microsoft Edge. Note that in some instances, you won’t have full control over deleting and managing data.
In the dashboard you can also customize privacy settings for other Microsoft products, including Xbox and Microsoft 365.
Get granular in the Settings app
All this shouldn’t take that long and will do a great deal to protect your privacy. If you want to dig even deeper into privacy protections, launch the Settings app and click Privacy. You’ll see the same General pane that we covered in the first tip in this story. (If for some reason you’re in a different section of Privacy, click General on the left-hand side of the screen.)
Below the switch to turn off your advertising ID are three more privacy settings you can disable:
- Language list: The list of languages you have enabled on your machine is your own business.
- App launches: This is used to build the “Most used” list on the Start menu and influences search result order — likely not a must-have for the privacy minded.
- Suggested content: This is used, in Microsoft’s words, to “suggest new content and apps you might find interesting.” Trust me, it’s unlikely you’ll find them interesting.
Turn all three of these off to further protect your privacy.
And there’s a lot more beyond the General pane. On the left-hand side of the screen, you’ll see additional areas where you can get even more granular about privacy — for example, in the “Inking & typing personalization” section you can change your global privacy options for inking and your typing history.
Tips for the truly paranoid
If you want to take privacy even further, there are a few more things you can do.
Stop using OneDrive
If you don’t like the idea of syncing your data to Microsoft’s OneDrive cloud storage service, you can stop using it. (There’s no way to uninstall it.) Right-click the OneDrive icon on the notification tray at the bottom right of the Windows desktop and select Settings from the menu that pops open. In the OneDrive Settings window, go to the Account tab, then click the Unlink this PC button. Next, click the Sync and backup tab and uncheck Start OneDrive when I sign in to Windows.

Unlinking OneDrive so it no longer syncs.
IDG
Don’t sync Windows settings across devices
In addition, you can say no to syncing your Windows settings among different devices. When you sync your settings, the way you’ve customized and set up Windows 10 will be synced to Microsoft’s servers. If you want to turn it off, go to Settings > Windows Backup and move the slider from On to Off in “Remember my preferences” and “Remember my apps.”
Turn off app diagnostics
Changing this setting isn’t a particularly big privacy-enhancer, but if you’re a real privacy fiend, every bit helps. It doesn’t affect desktop apps like Word or Excel, and instead targets built-in Windows apps and the apps you download from the Microsoft Store. Turning off app diagnostics stops any of those apps from getting details about other apps — things such as their internal names, package names, the user name of the person running the app, and techie details such as memory usage. Developers use this information all the time, but your garden-variety apps shouldn’t need any of it.
To turn it off, select Settings > Privacy > App diagnostics, and in the “Allow access to app diagnostic info on this device” section, click Change. When a slider appears, move it to Off.

Turn off app diagnostics to prevent built-in Windows apps and Microsoft Store apps from getting details about other apps.
IDG
Don’t share Windows updates
Finally, you can change the way Windows updates. In Settings > Update & Security > Delivery Optimization, turn off the switch next to Allow downloads from other PCs. When turned on, this function lets your Windows 10 system share its update files with other Windows 10 computers on the internet through peer-to-peer distribution.
These steps can take you a long way towards making sure that Windows 10 doesn’t cross the line into gathering data you’d prefer remain private.
This article was originally published in January 2016 and most recently updated in August 2024.


