If you can’t always see what you’re typing very well on your iPhone, iPad, or Mac, you no longer have to adjust the font size for the app or entire system just to read your writing more easily. One of Apple’s newer Accessibility features gives you a customizable, magnified view in a floating window so you can see every character with crystal-clear clarity in real time.
For low vision, other vision impairments, or just enhanced typing visibility, try Hover Typing, which was introduced with iOS 18, iPadOS 18, and macOS Sequoia 15. Not only can it help you read what you’re writing in normal conditions, but it can also help in situations where screen glare or low light might make small text difficult to read.
Unlike Hover Text, which enlarges content on the screen when you use a pointer, Hover Typing doesn’t require a connected mouse or trackpad. It’s explicitly designed to assist with typing, whether you’re using an on-screen virtual keyboard or a connected physical one.
Jump to a Section
Enable Hover Typing on iOS, iPadOS, and macOS
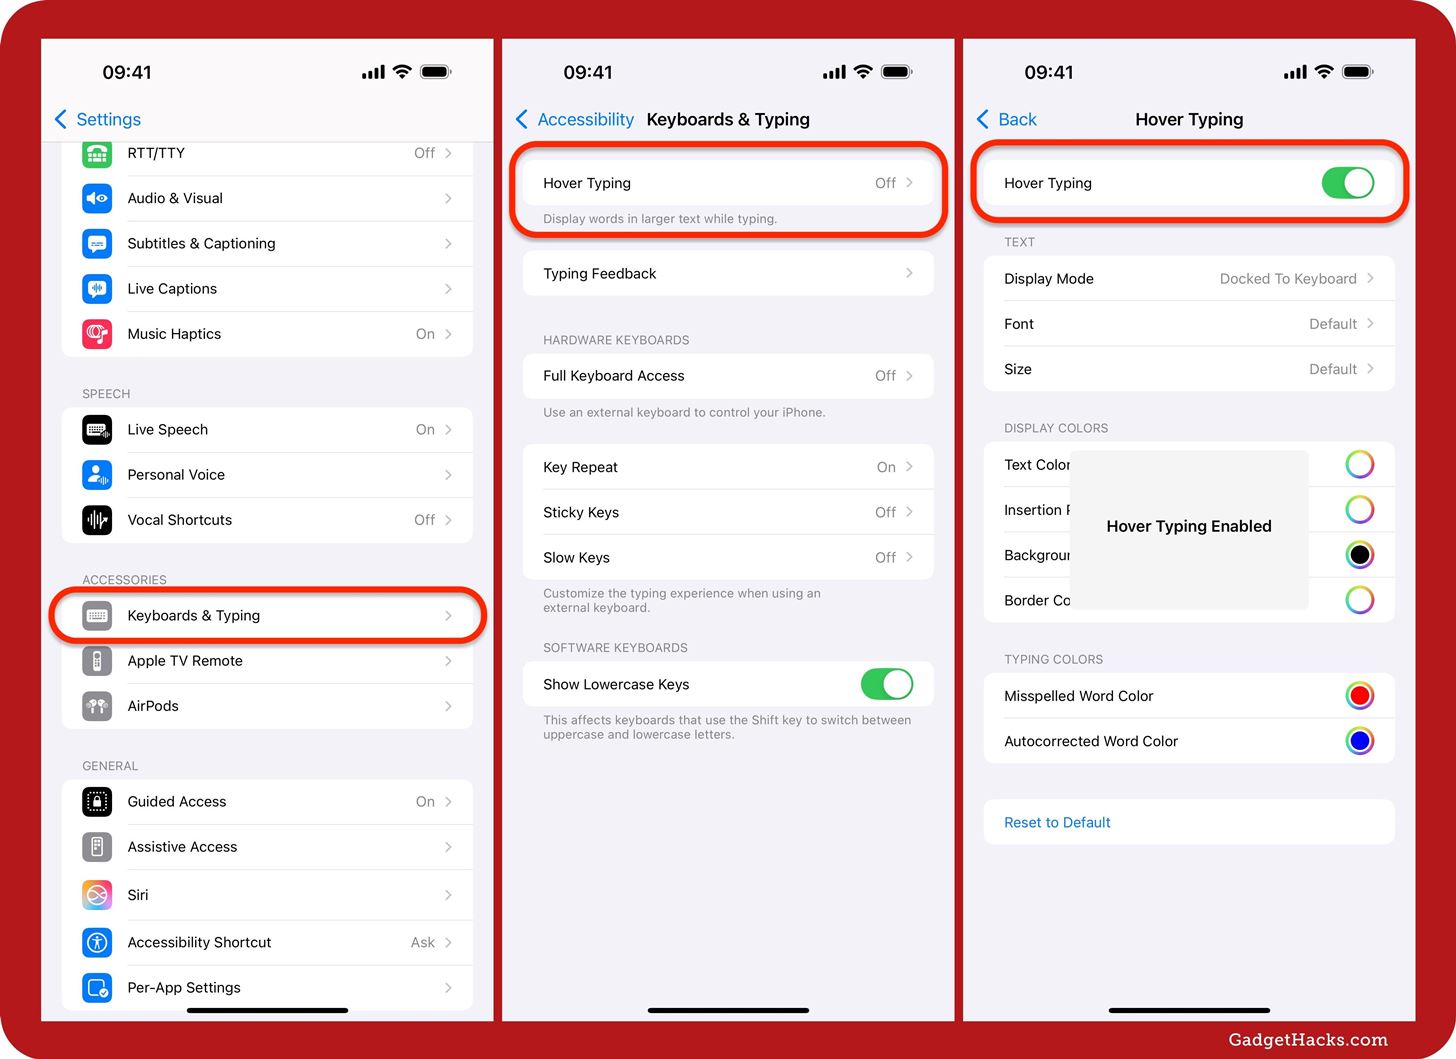
On your iPhone or iPad, navigate to Settings » Accessibility » Keyboards & Typing » Hover Typing, then toggle on the “Hover Typing” switch. You can also find the switch via a Settings or Spotlight search.
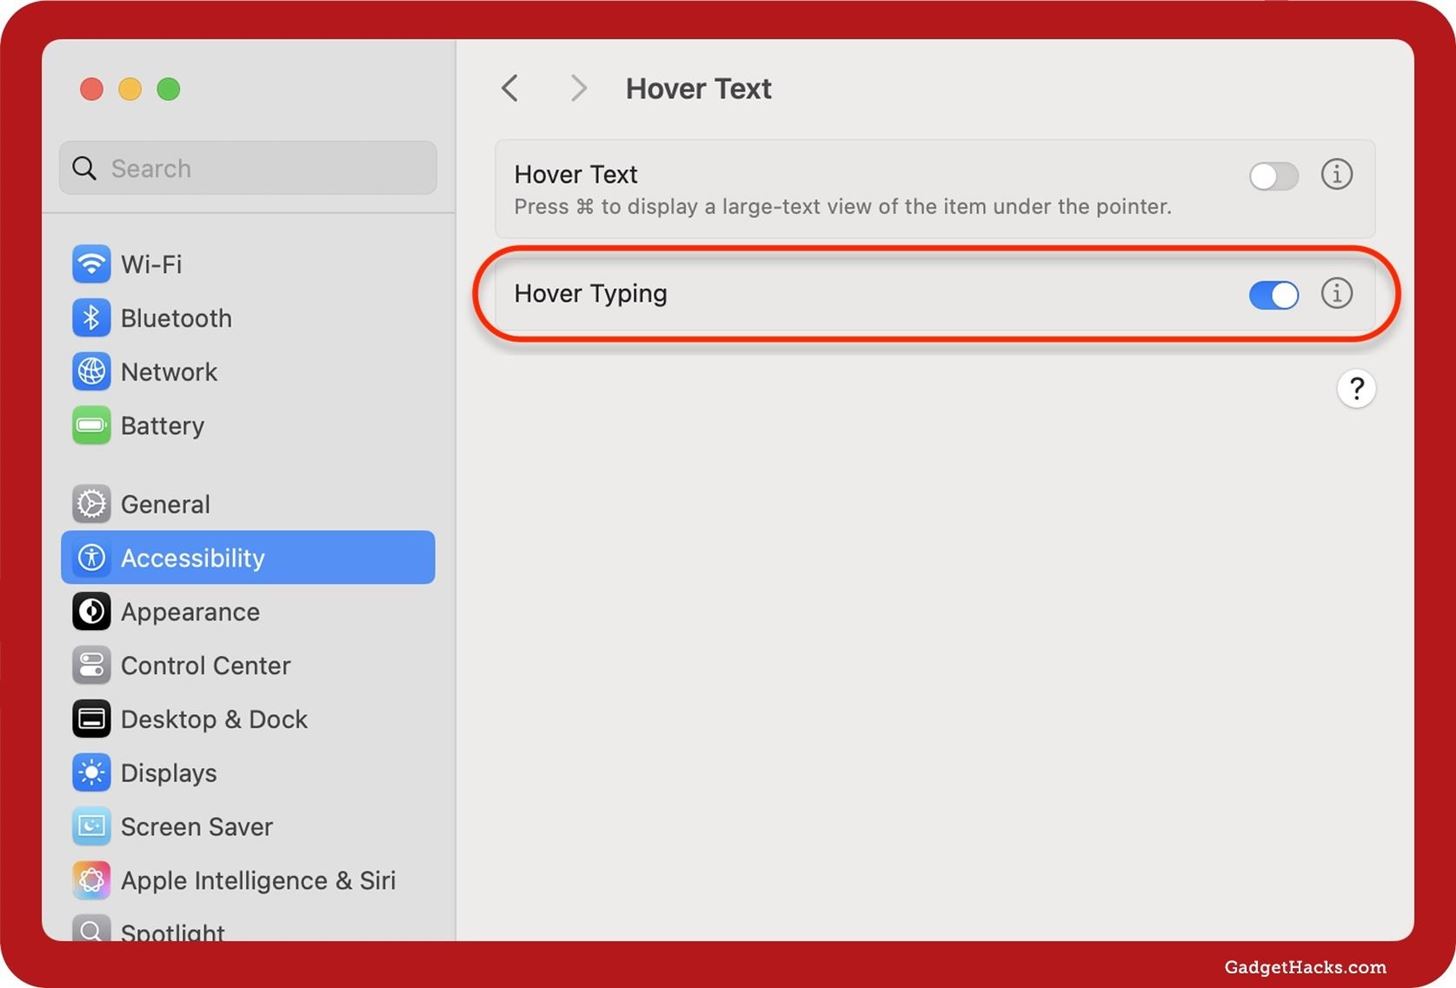
On your Mac, navigate to System Settings » Accessibility » Hover Text, then toggle on the “Hover Typing” switch. You can also find the switch via a Settings or Spotlight search.
Use Hover Typing on iOS, iPadOS, and macOS
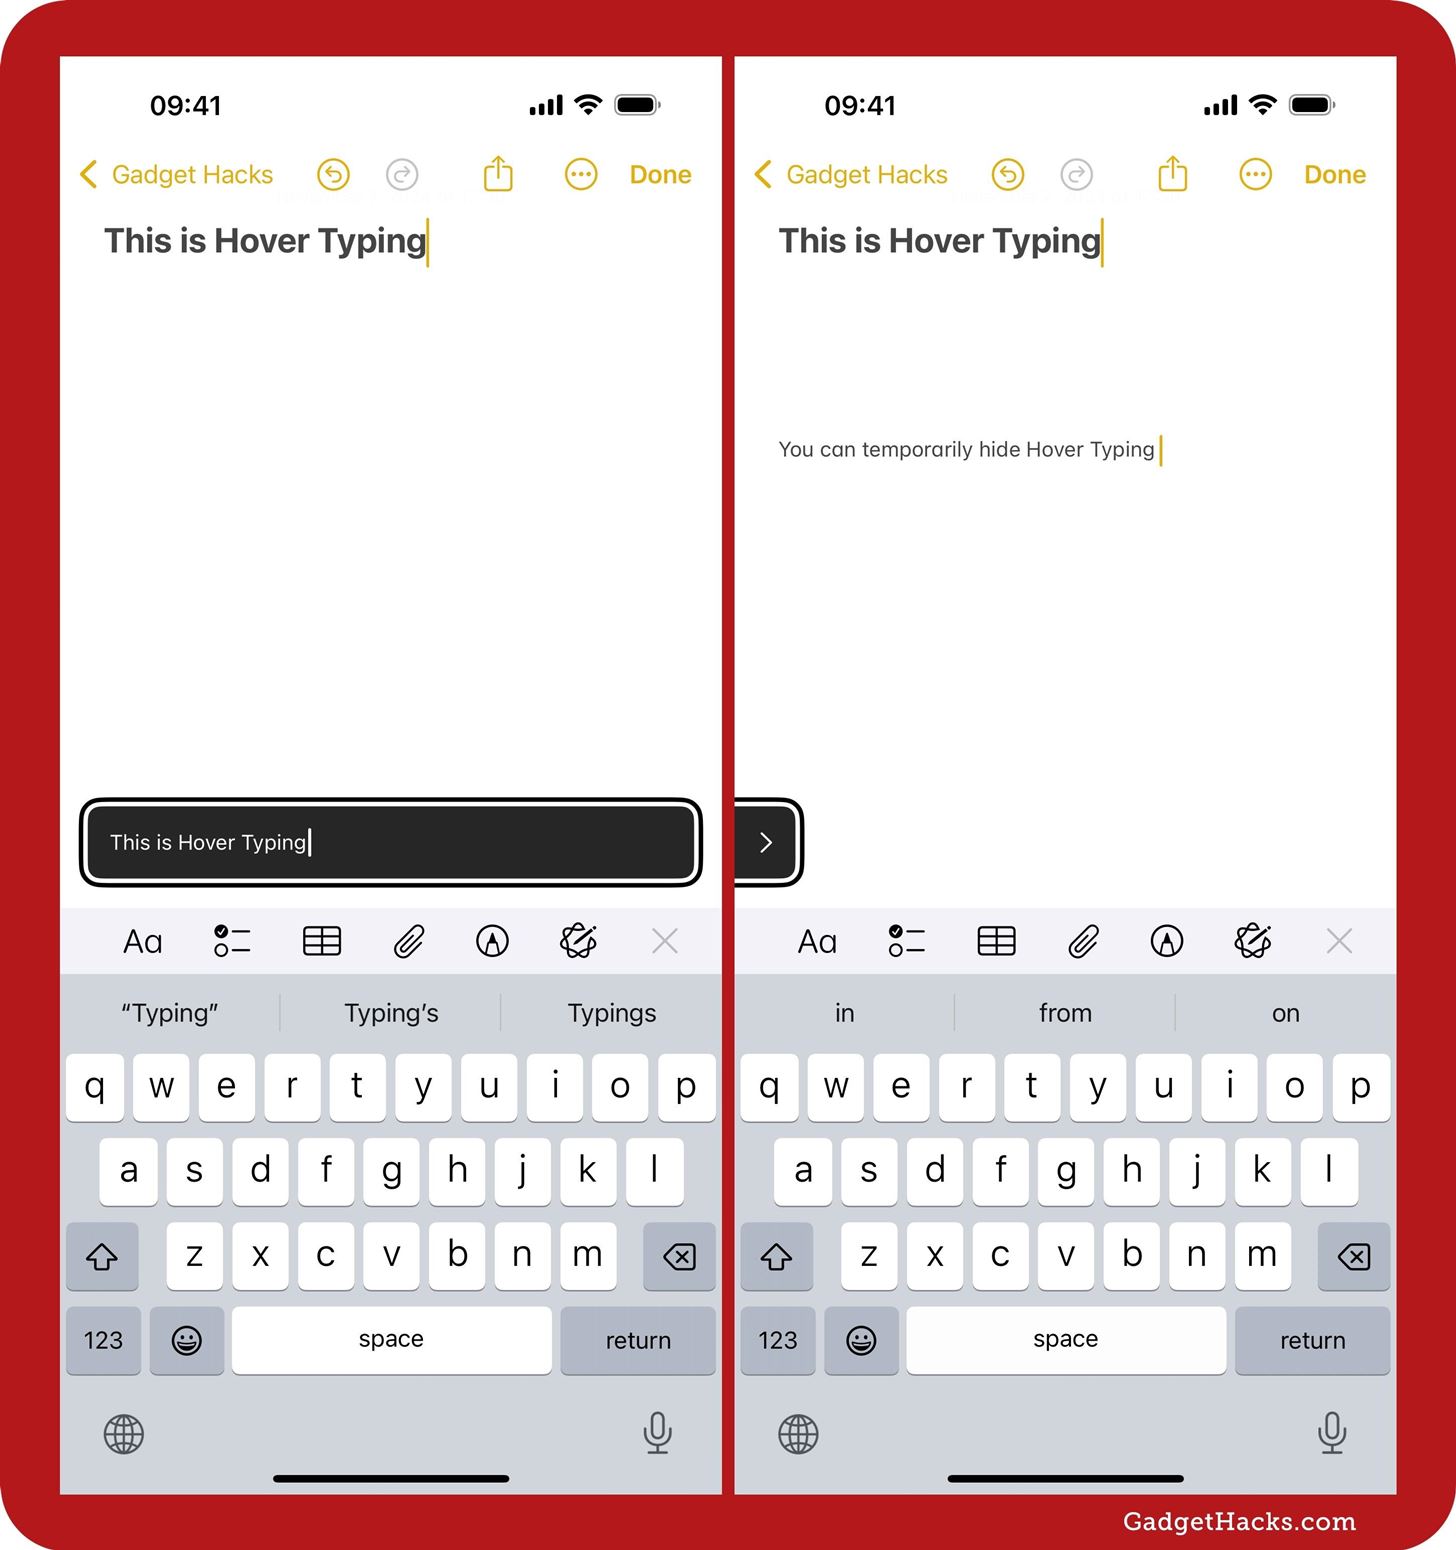
With Hover Typing enabled, a magnified text view automatically appears in a floating window whenever you start typing in a text field. This floating window gives you an enlarged, editable view of each character and word you enter with the keyboard.
If the Hover Typing window blocks something you need to see or interact with, such as a button you need to tap or click, you can quickly hide it. On iOS and iPadOS, swipe it to either side of the screen to dock it temporarily. To unhide it, tap its arrow, swipe it back in, or simply start typing again. On macOS, just press the Esc key, then start typing again to unhide it.
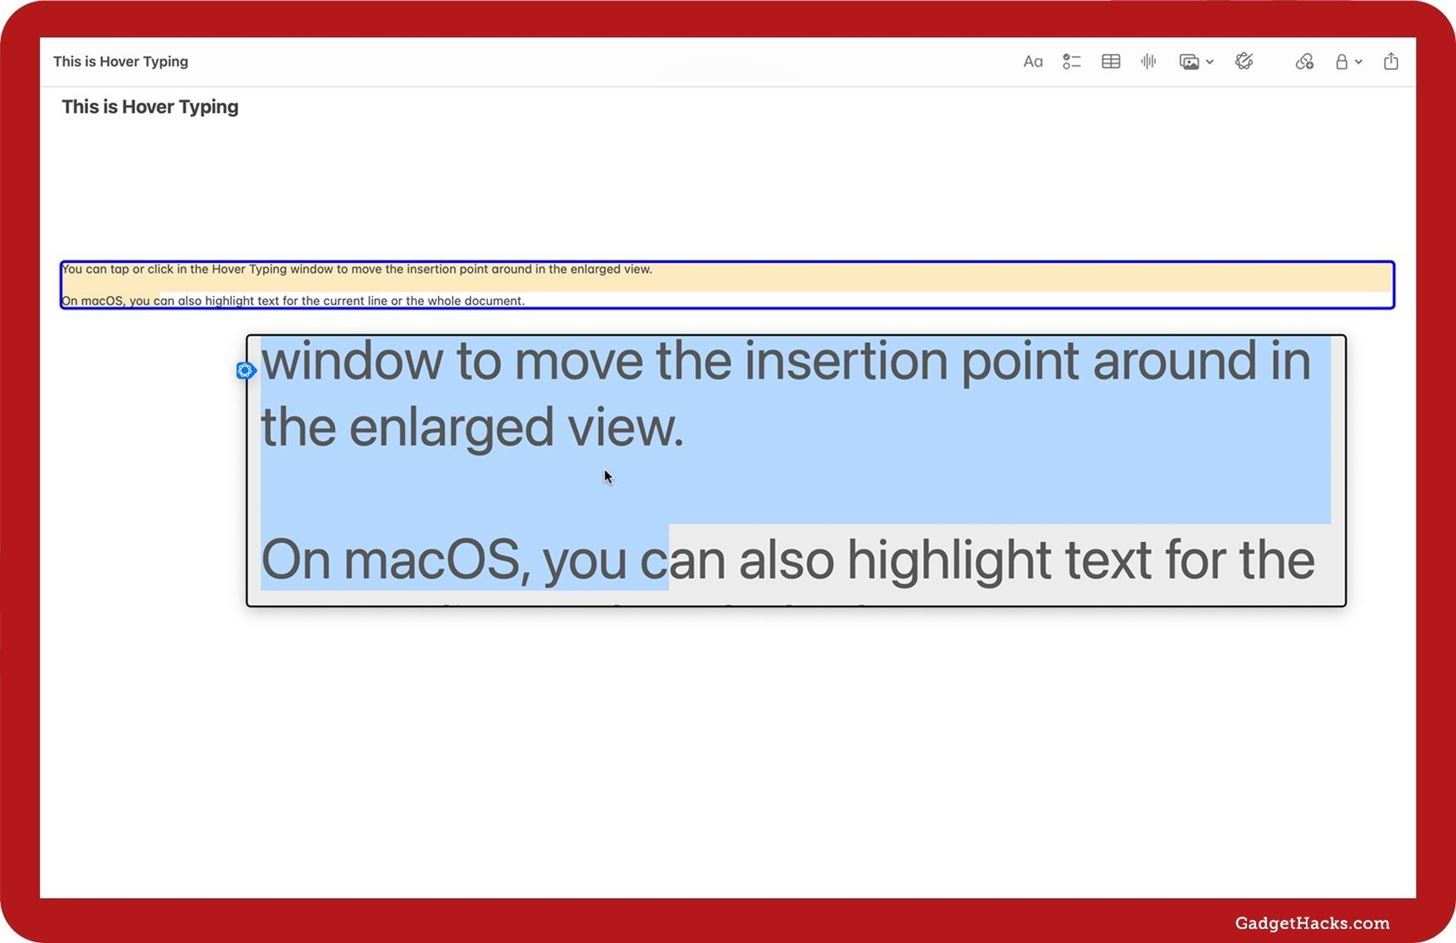
You can tap or click in the Hover Typing window to move the insertion point around in the enlarged view. On macOS, you can also highlight text for the current line or the whole document.
Customize Hover Typing on iOS and iPadOS
Hover Typing isn’t just a one-size-fits-all feature. Apple gives you the ability to customize its appearance to suit your preferences. On iOS or iPadOS, go back to Settings » Accessibility » Keyboards & Typing » Hover Typing, where you’ll see customization options for text and colors. You can also find the preferences via a Settings or Spotlight search for “Hover Typing Colors.”
Text
In the Text section, you can adjust where the Hover Typing window appears on the screen, what font it uses, and its text size.
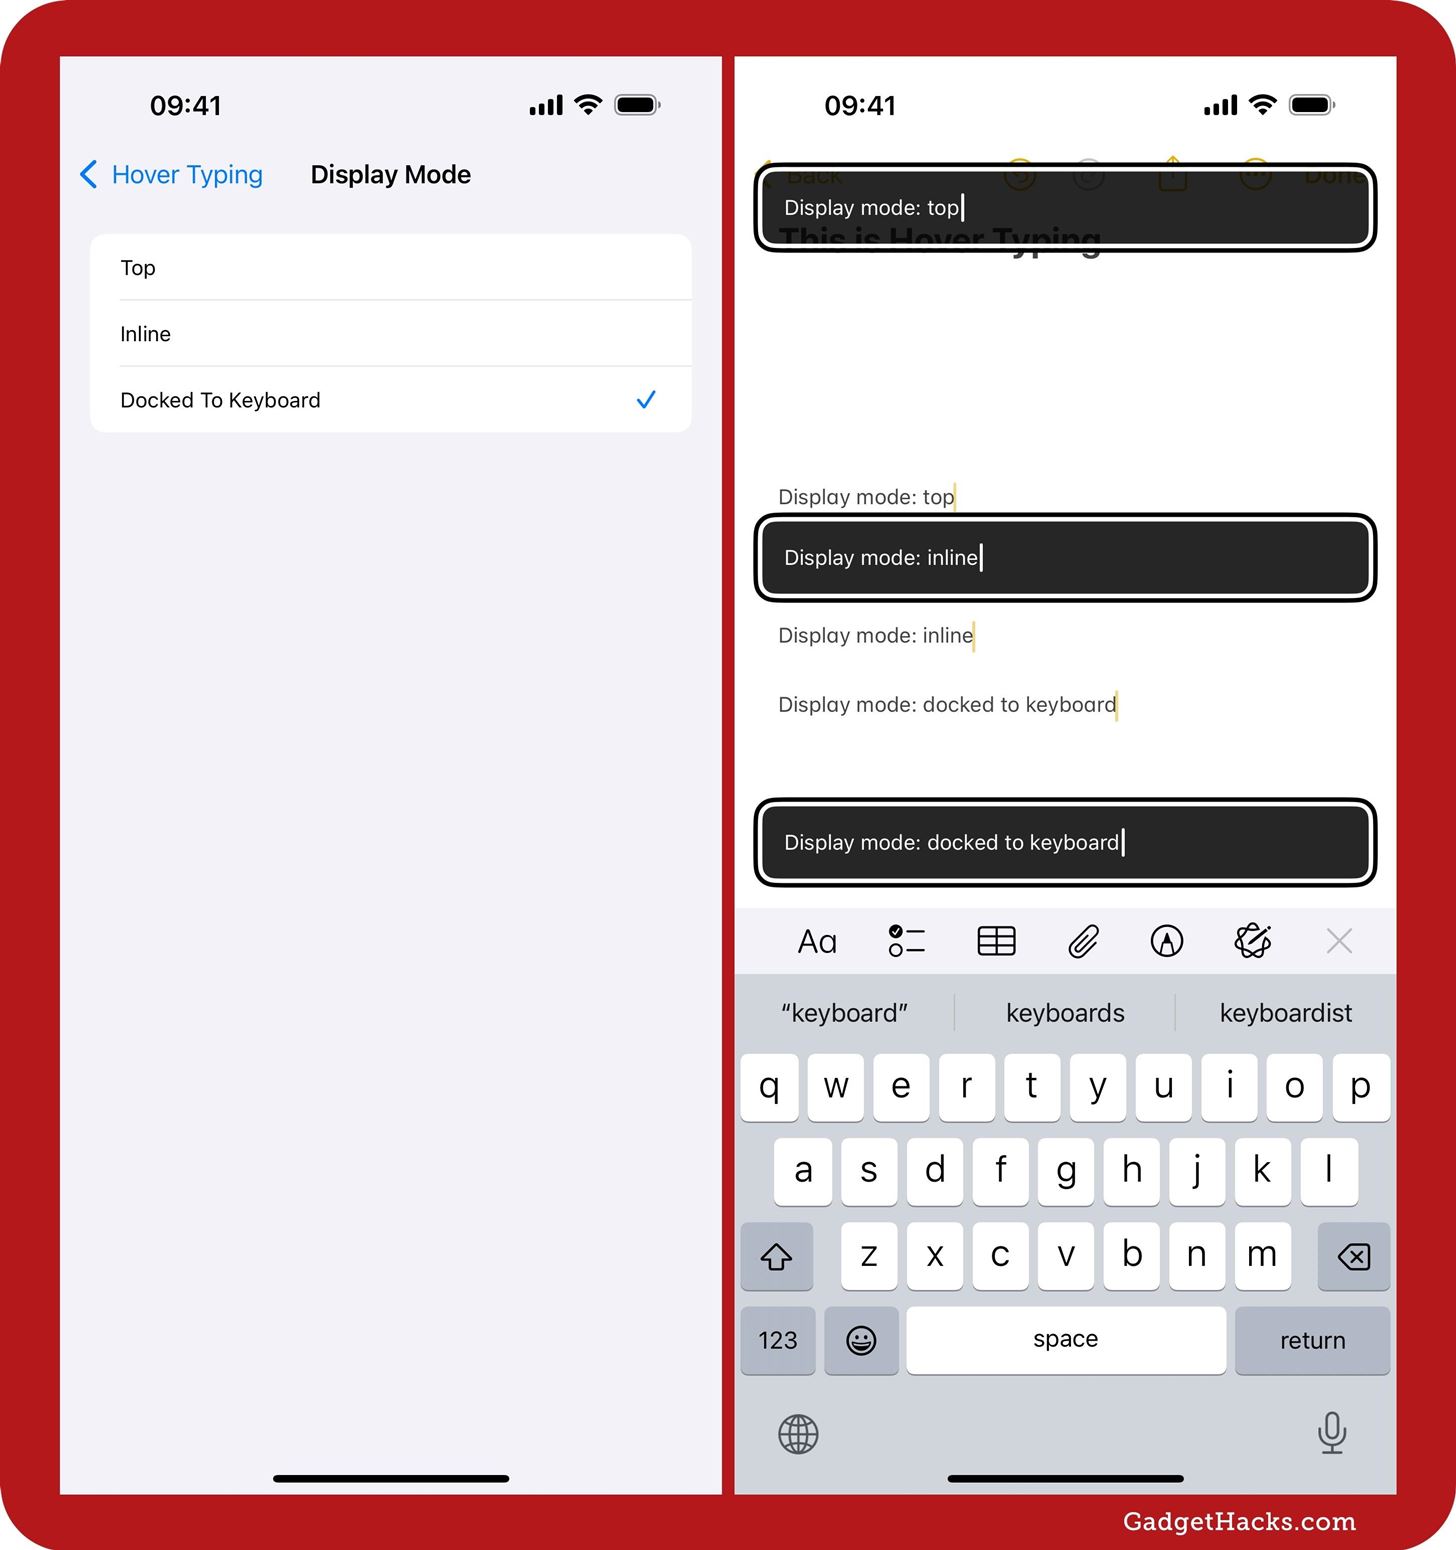
- Display Mode: Top sticks the window to the top of the screen; Inline keeps the window either directly above or below the line you’re typing; Docked to Keyboard keeps the window directly above the keyboard.
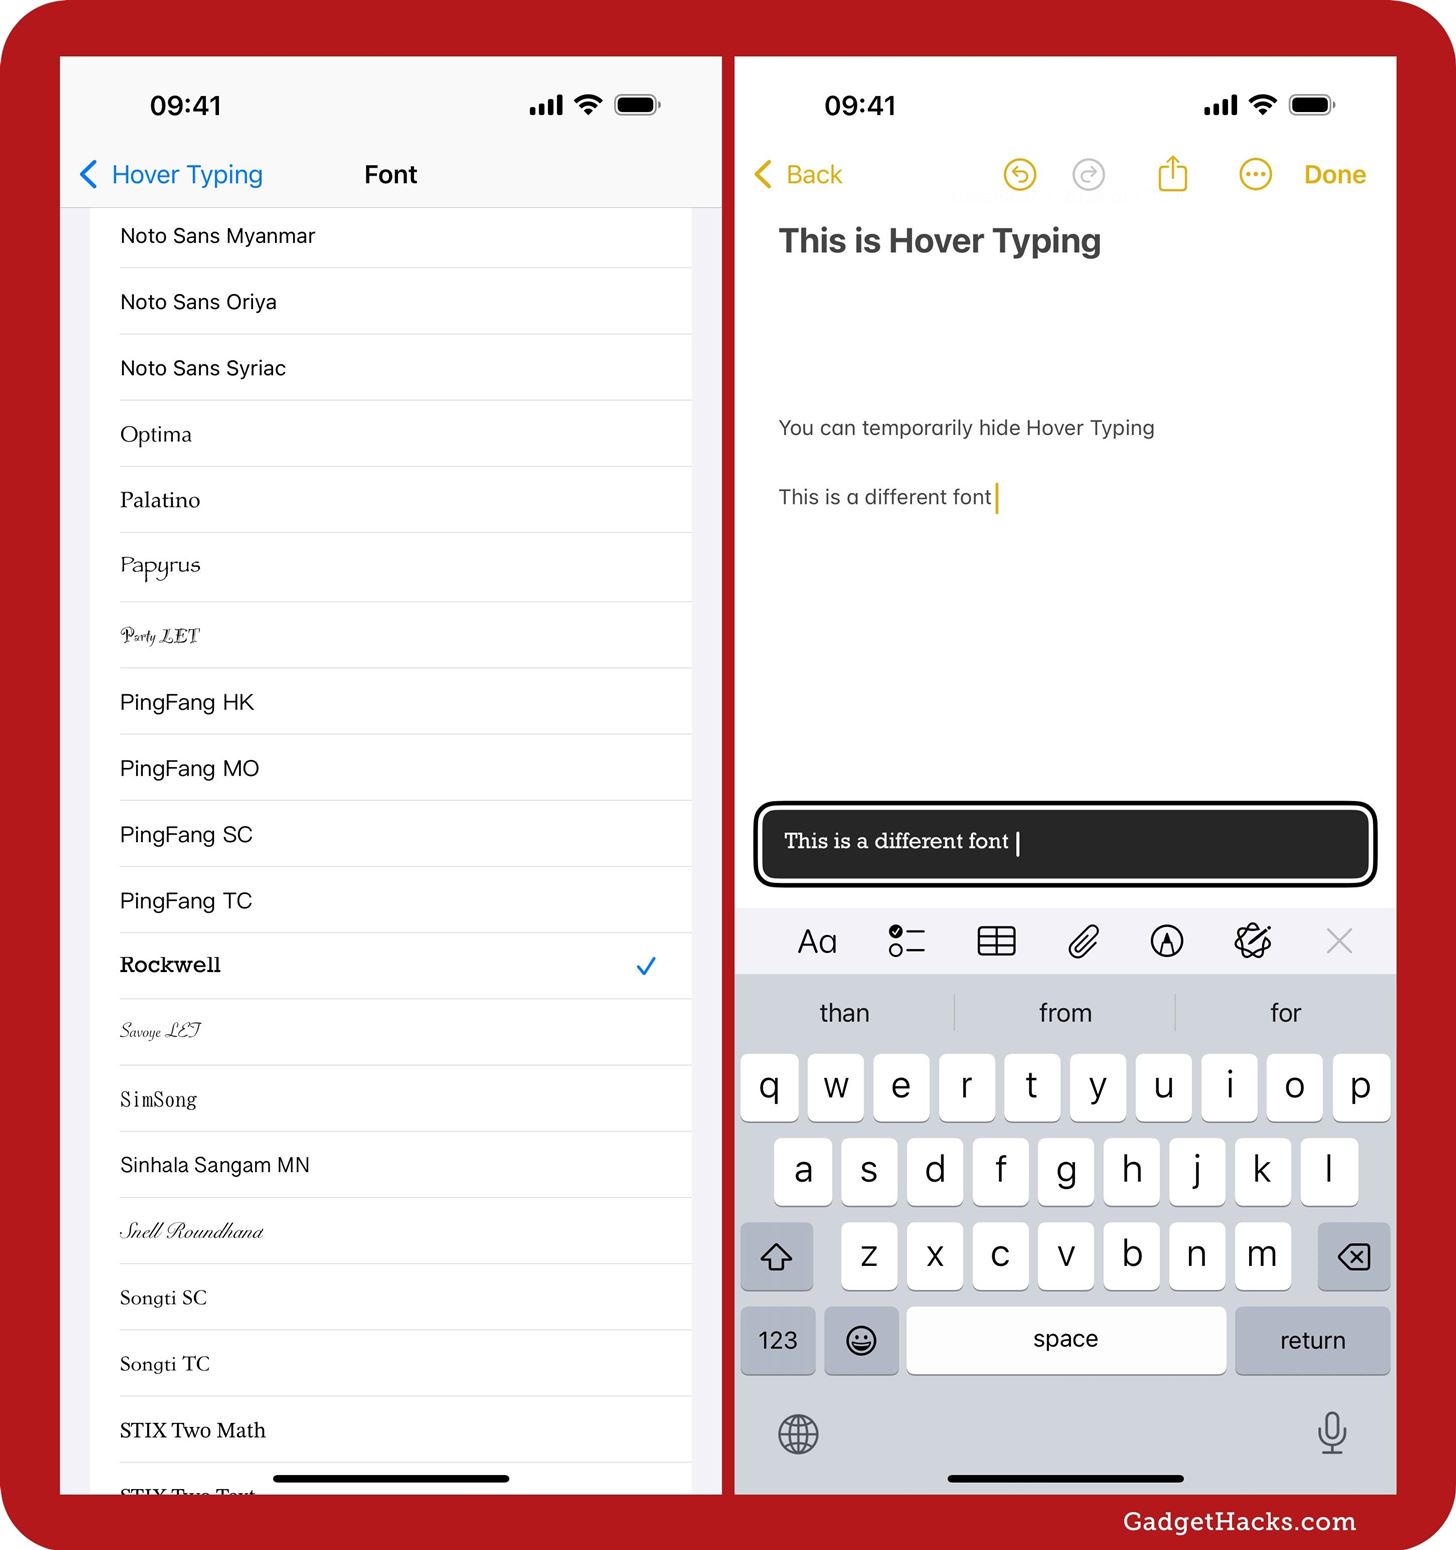
- Font: Change the font type from the default to any font style available on your device.
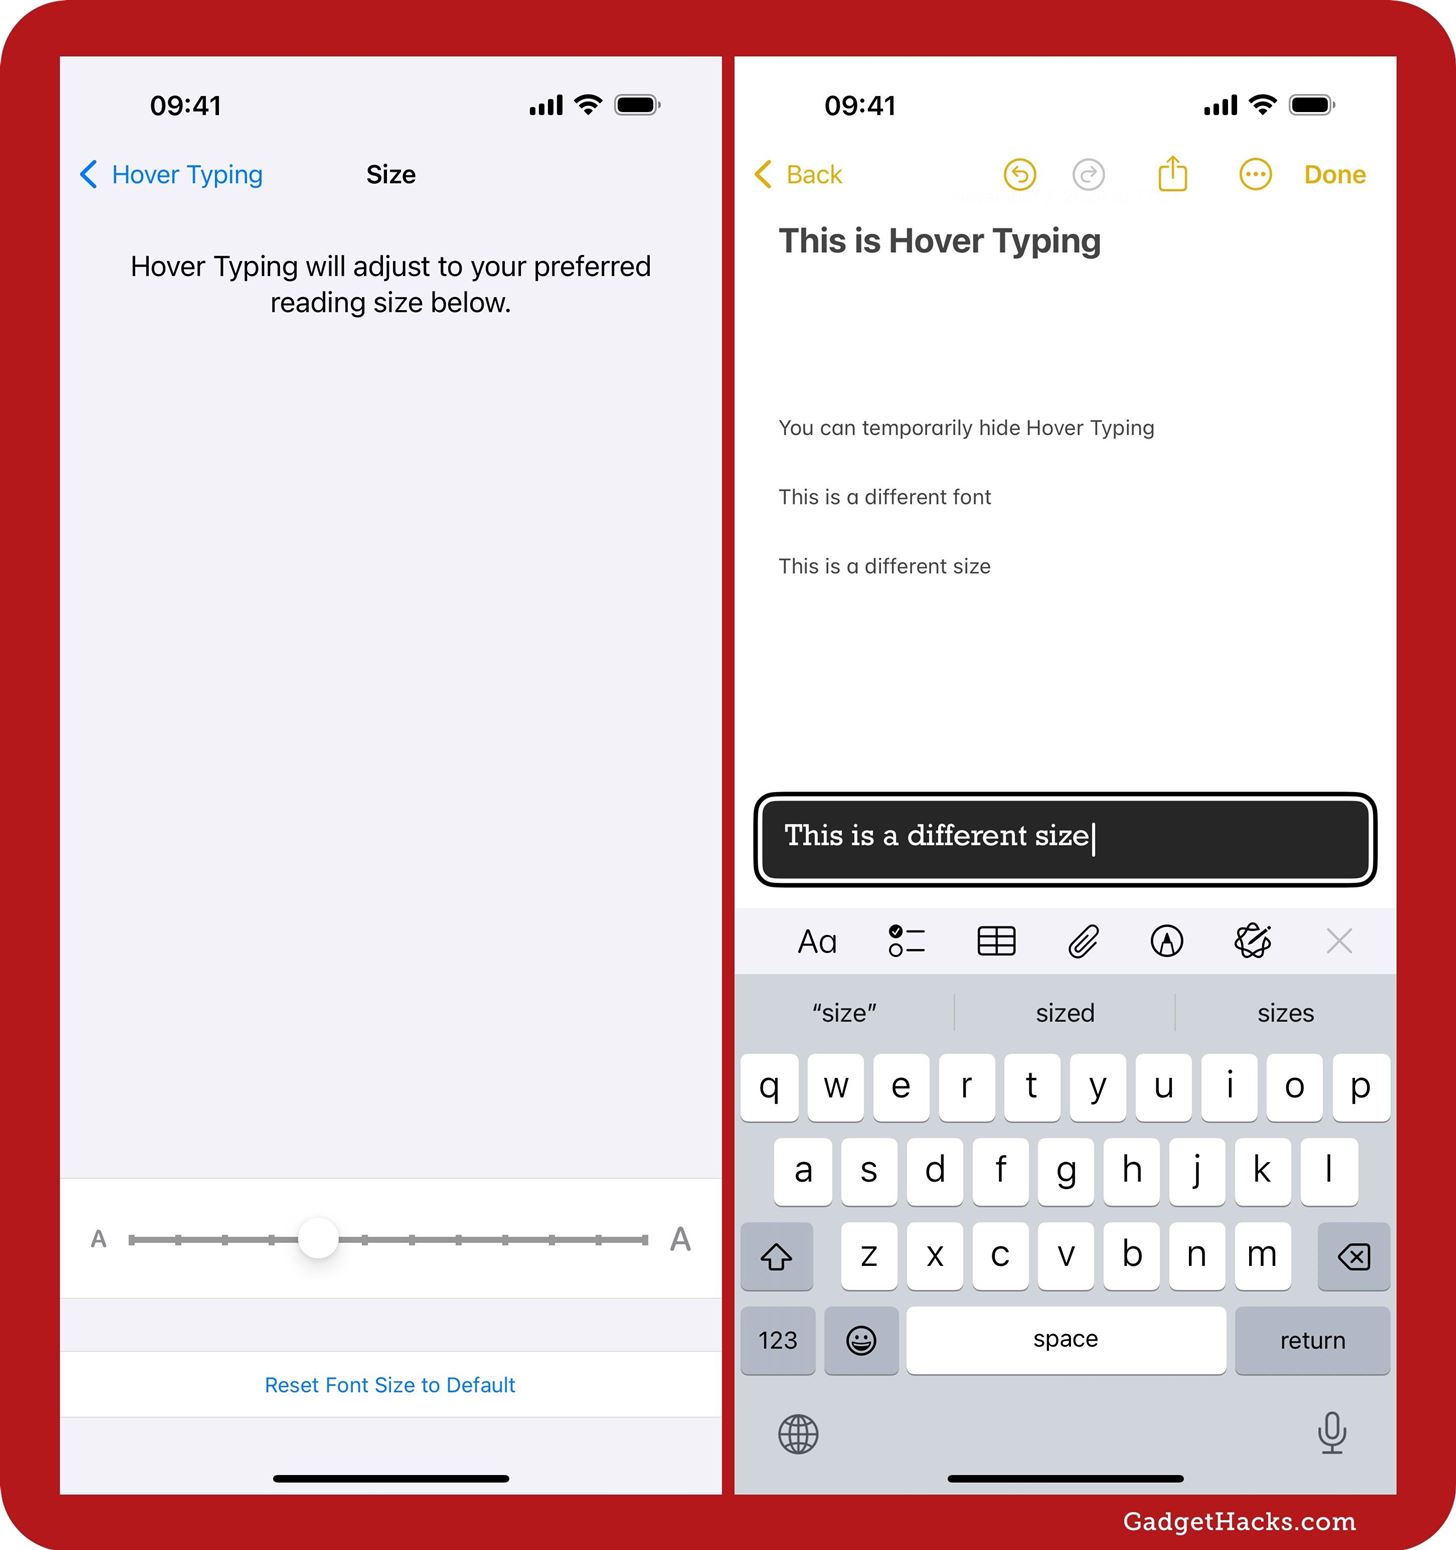
- Size: Adjust the font size to your preferred reading size using the slider. There are 12 different sizes available. The setting does not seem to auto-adjust when the Text Size is changed systemwide or in individual apps, so it’s possible to have larger text in the text field itself and smaller text in the Hover Typing window.
Display and Typing Colors
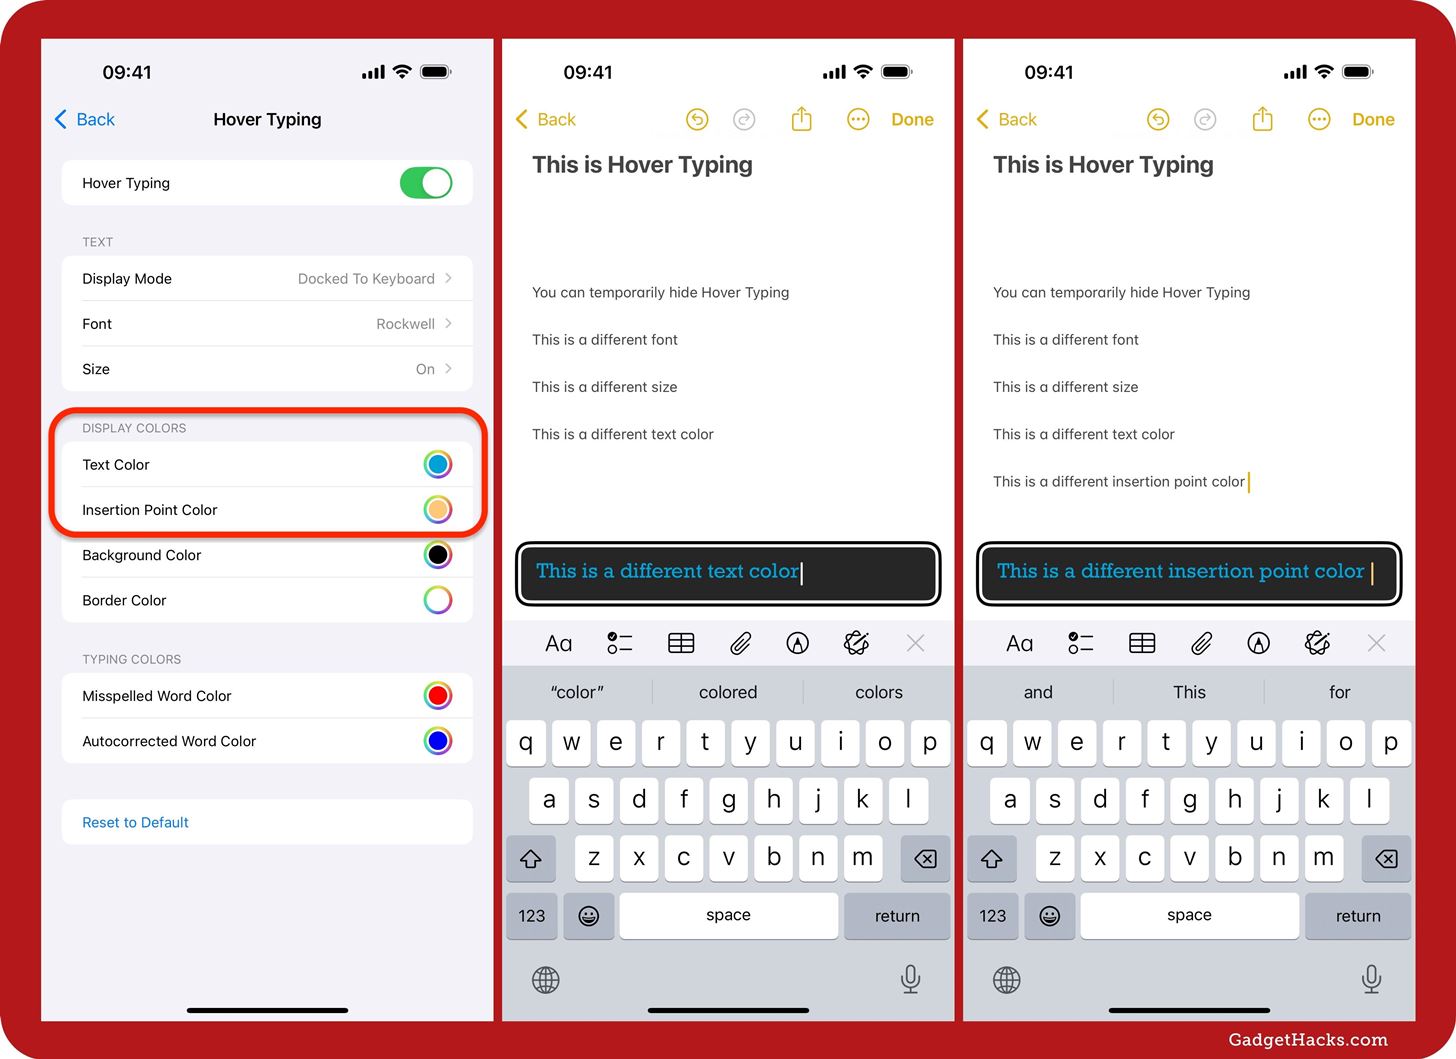
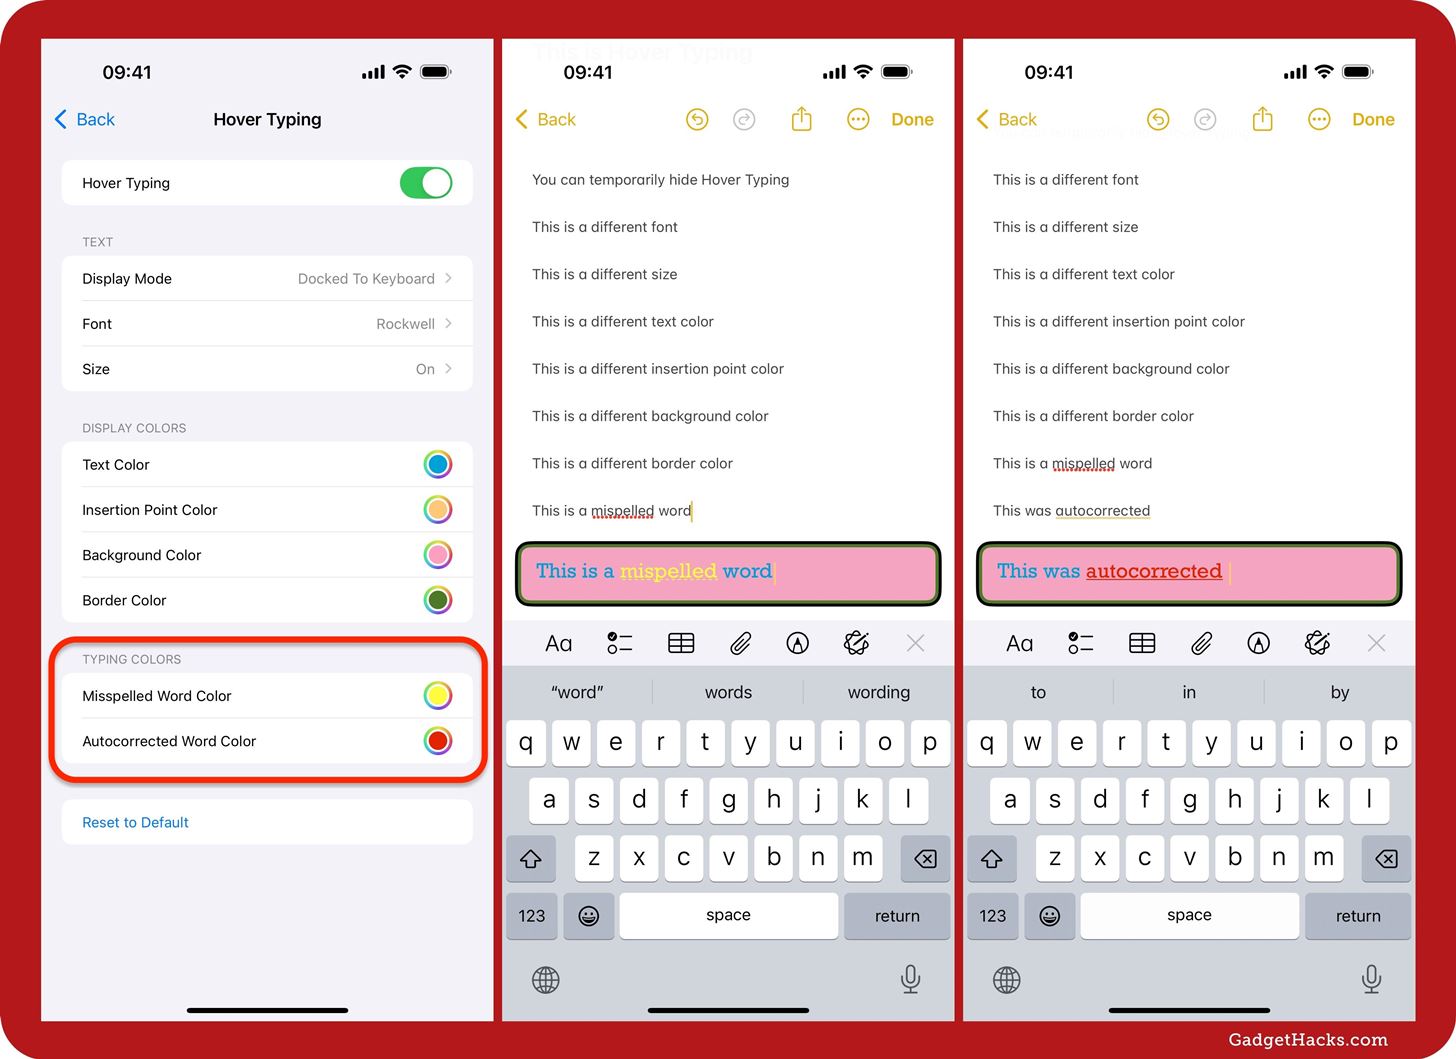
In the Display Colors and Typing Colors sections, you can adjust the colors used for the text, insertion point, background, and border used for the Hover Typing window, as well as how misspelled and autocorrected words appear.
Simply tap the current color next to each option to bring up the color picker. The selector gives you a color grid, spectrum view, sliders, an eyedropper tool, opacity adjustments, and hex color coding, so you should have no problem getting the right shade. If you change one color, you may have to change others as needed for clarity.
- Text Color: This changes the color of text inside the Hover Typing window.
- Insertion Point Color: This changes the color of the insertion point (cursor) inside the Hover Typing window.
- Background Color: This changes the color of Hover Typing’s background.
- Border Color: This changes the color of Hover Typing’s border, which could help the Hover Typing window stand out even more from the app it’s on top of.
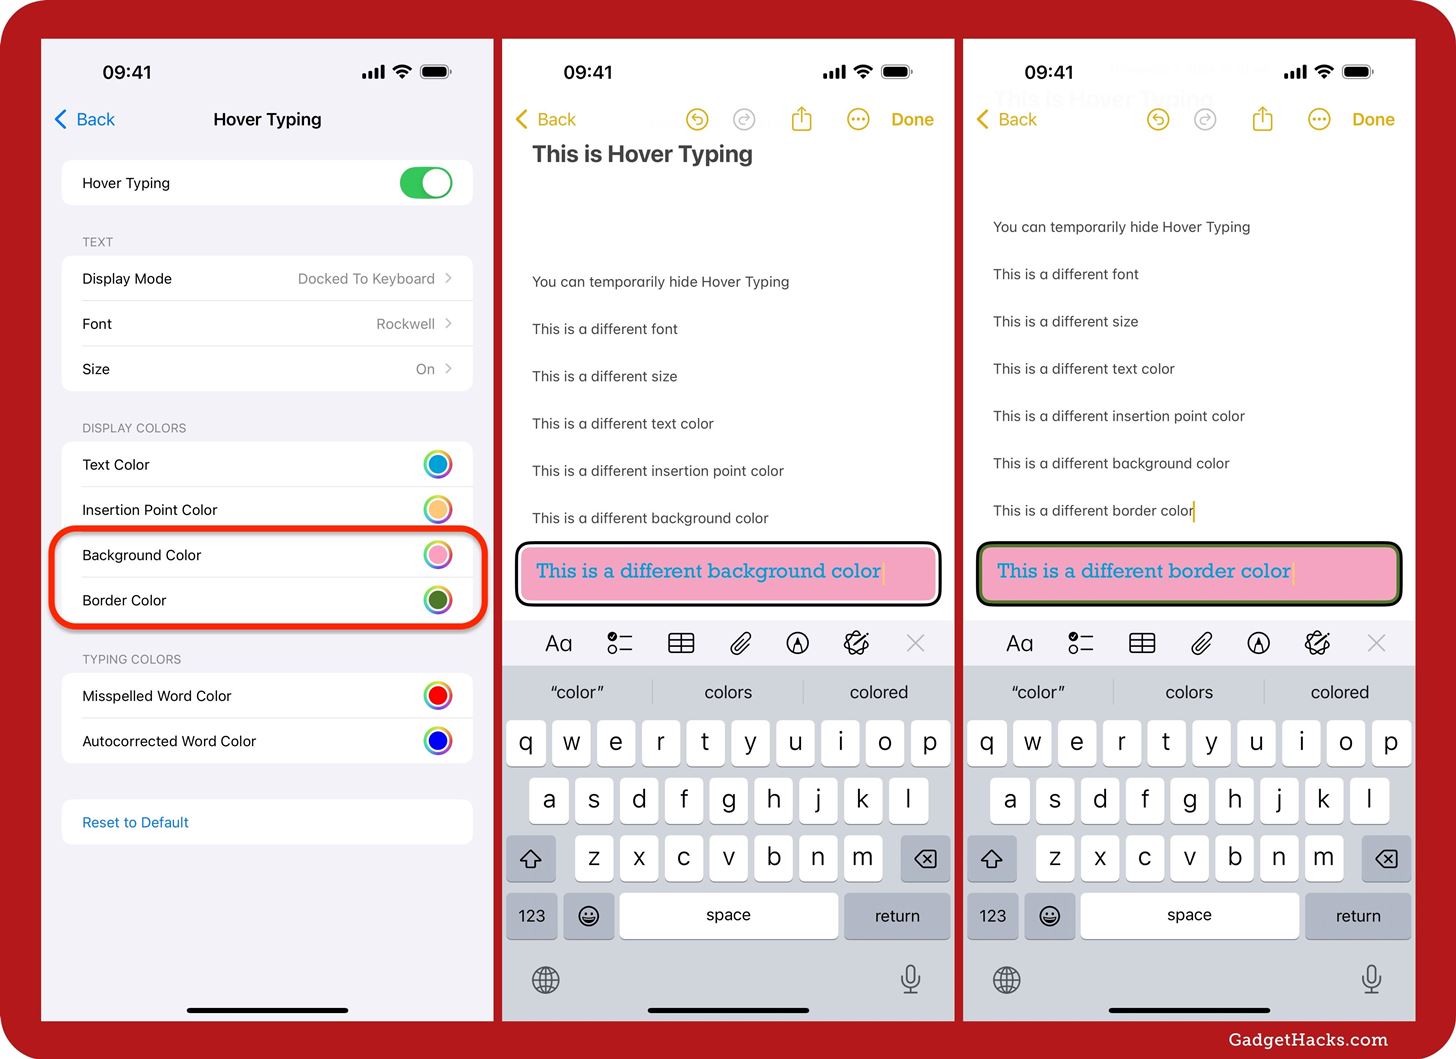
- Misspelled Word Color: This changes the color of how misspellings appear in the Hover Typing window.
- Autocorrected Word Color: This changes the color of how autocorrected words appear in the Hover Typing window.
Customize Hover Typing on macOS
Like iOS and iPadOS, you can adjust the following settings for text and colors. To find them, go back to System Settings » Accessibility » Hover Text, then click the info (i) button next to the “Hover Typing” switch. You can also find the preferences via a Settings or Spotlight search for “Hover Typing Settings.”
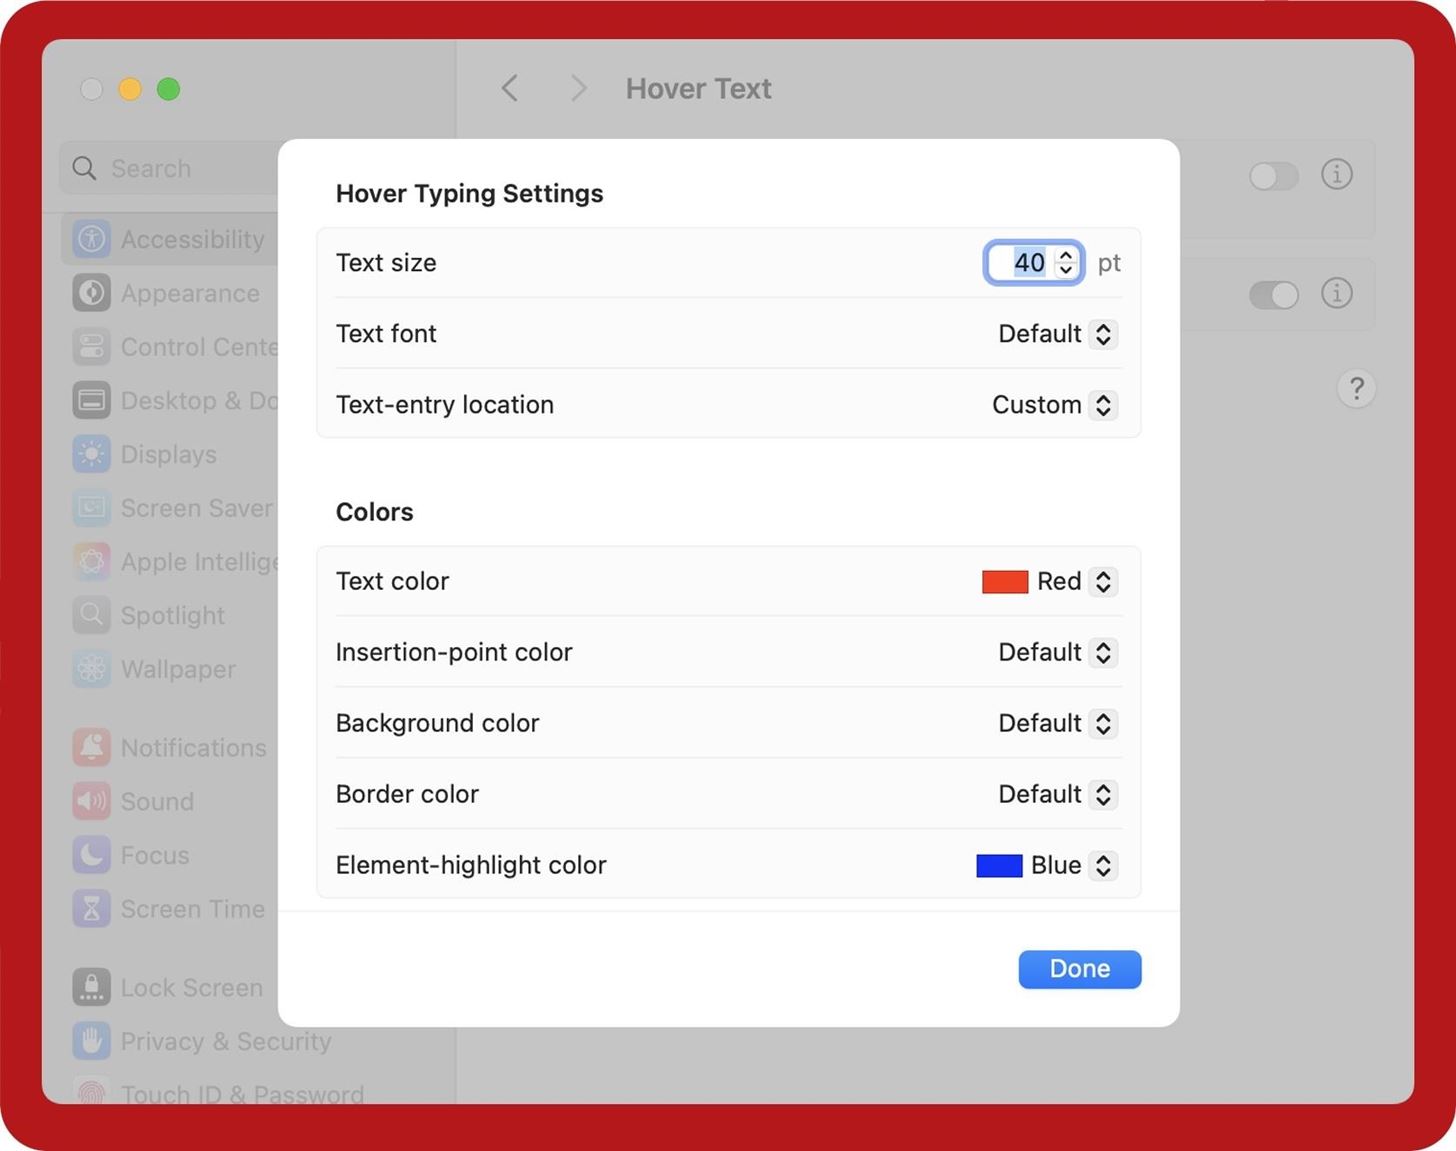
- Text size: Adjust the font size to your preferred reading size using the up and down arrows or by typing a number in.
- Text font: Change the font type from the default to any font style available on your device.
- Text-entry location: There are options for Top Left, Top Right, Bottom Left, and Bottom Right, which are self-explanatory. You can also choose Near Current Line, which is similar to Inline on iOS and iPadOS, and Custom, which lets you click on a corner of the Hover Typing window to drag and drop it wherever you want.
- Text color: Use the color picker to find and select a new color for text inside the Hover Typing window.
- Insertion-point color: Use the color picker to find and select a new color for the insertion point (cursor) inside the Hover Typing window.
- Background color: Use the color picker to find and select a new color for Hover Typing’s background.
- Border color: Use the color picker to find and select a new color for Hover Typing’s border. This option helps the Hover Typing window stand out even more from the app it’s on top of.
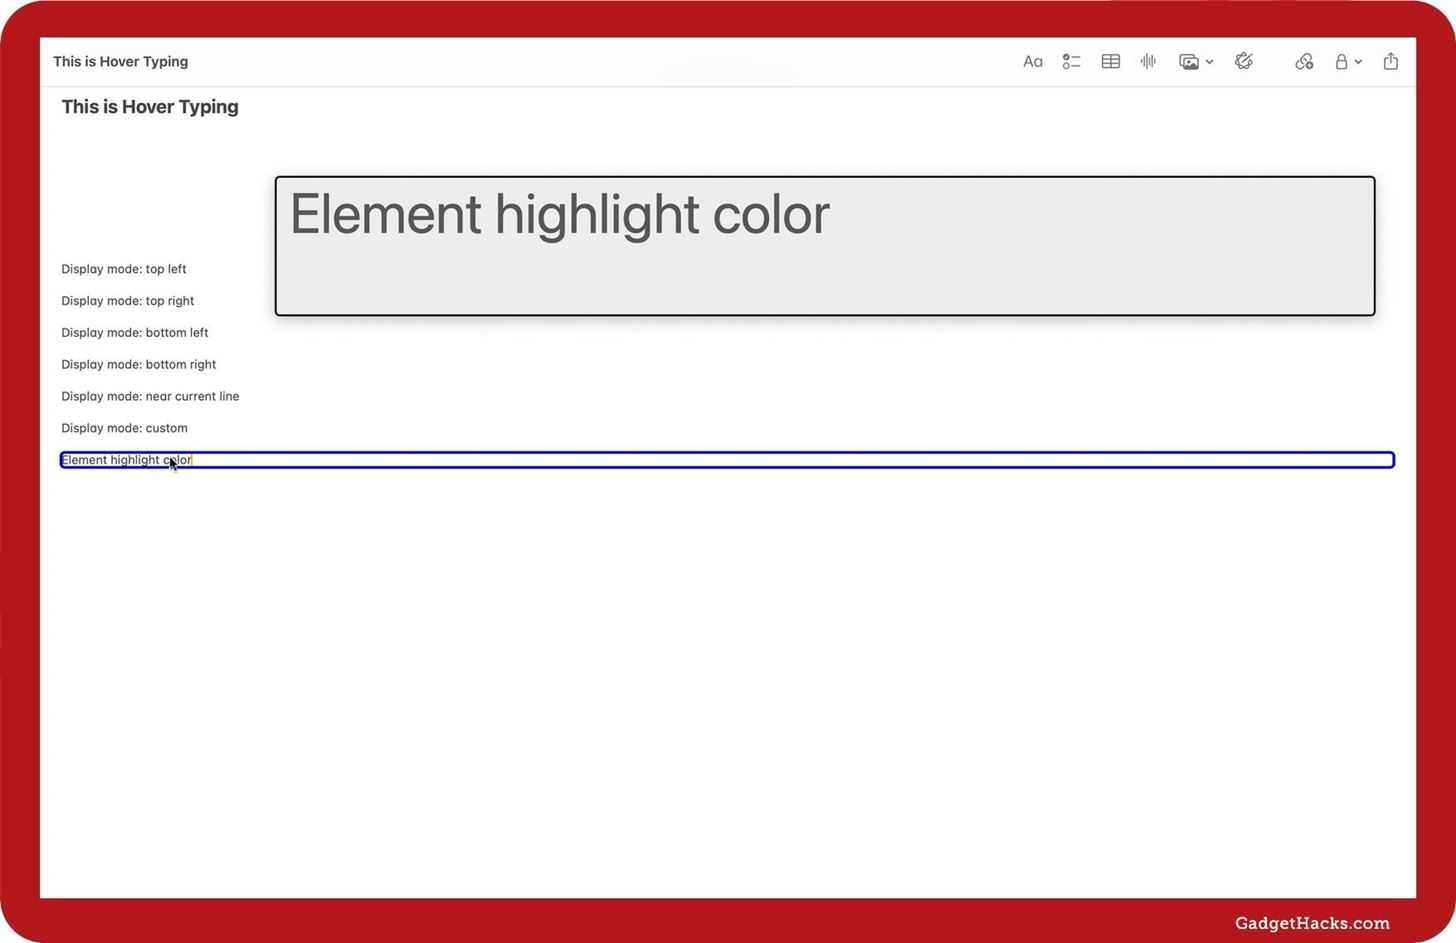
- Element-highlight color: This will use a colored border to highlight the line in the text field you’re currently writing or editing in the app itself, so you know exactly where you are in the document. The border will adjust accordingly if you select multiple lines in the text field or Hover Typing window. Use the color picker to find and choose a new color that works for you.
There are no options to adjust misspellings or autocorrections on macOS.
Create a Shortcut to Toggle Hover Typing
To toggle Hover Typing on or off faster, you can use any of the following shortcuts.
- Set it as an Accessibility Shortcut: On iOS or iPadOS, go to Settings » Accessibility » Accessibility Shortcut, then check Hover Typing. To use it, triple-click your Side or Home button. On macOS, go to System Settings » Accessibility » Shortcut, then check Hover Typing. To use it, press Touch ID three times quickly or press Option-Command-F5.
- Set it as a Back Tap gesture: On iOS, go to Settings » Accessibility » Touch » Back Tap, choose Double Tap or Triple Tap, and select Hover Typing. Tap the back of your iPhone two or three times quickly to use it.
- Set it as a Lock Screen control: On iOS, open the Lock Screen switcher, tap “Customize” on the Lock Screen you want, choose Lock Screen, and tap one of the two current controls at the bottom of the screen to remove it. Then, tap the plus (+) sign, choose Hover Typing, and hit “Done.” To use it, tap the Hover Typing icon on your Lock Screen.
- Set it as a Control Center control: On iOS or iPadOS, open up Control Center, touch and hold the background, tap Add a Control, and choose Hover Typing. You can resize it by pulling its handle if you’d like before closing the controls editor. To use it, open Control Center and tap Hover Typing. Alternatively, you can add the Accessibility Shortcuts control if you enabled it as an Accessibility Shortcut, as seen above. On macOS, go to Settings » Control Center, and toggle on Show in Control Center for Accessibility Shortcuts. To use it, click the Control Center icon in the menu bar, then the Accessibility Shortcuts icon, and choose Hover Typing.
- Set it as a menu bar item: On macOS, go to Settings » Control Center, and toggle on Show in Menu Bar for Accessibility Shortcuts. To use it, click the Accessibility Shortcuts icon in the menu bar and choose Hover Typing.
Reset Hover Typing to the Defaults
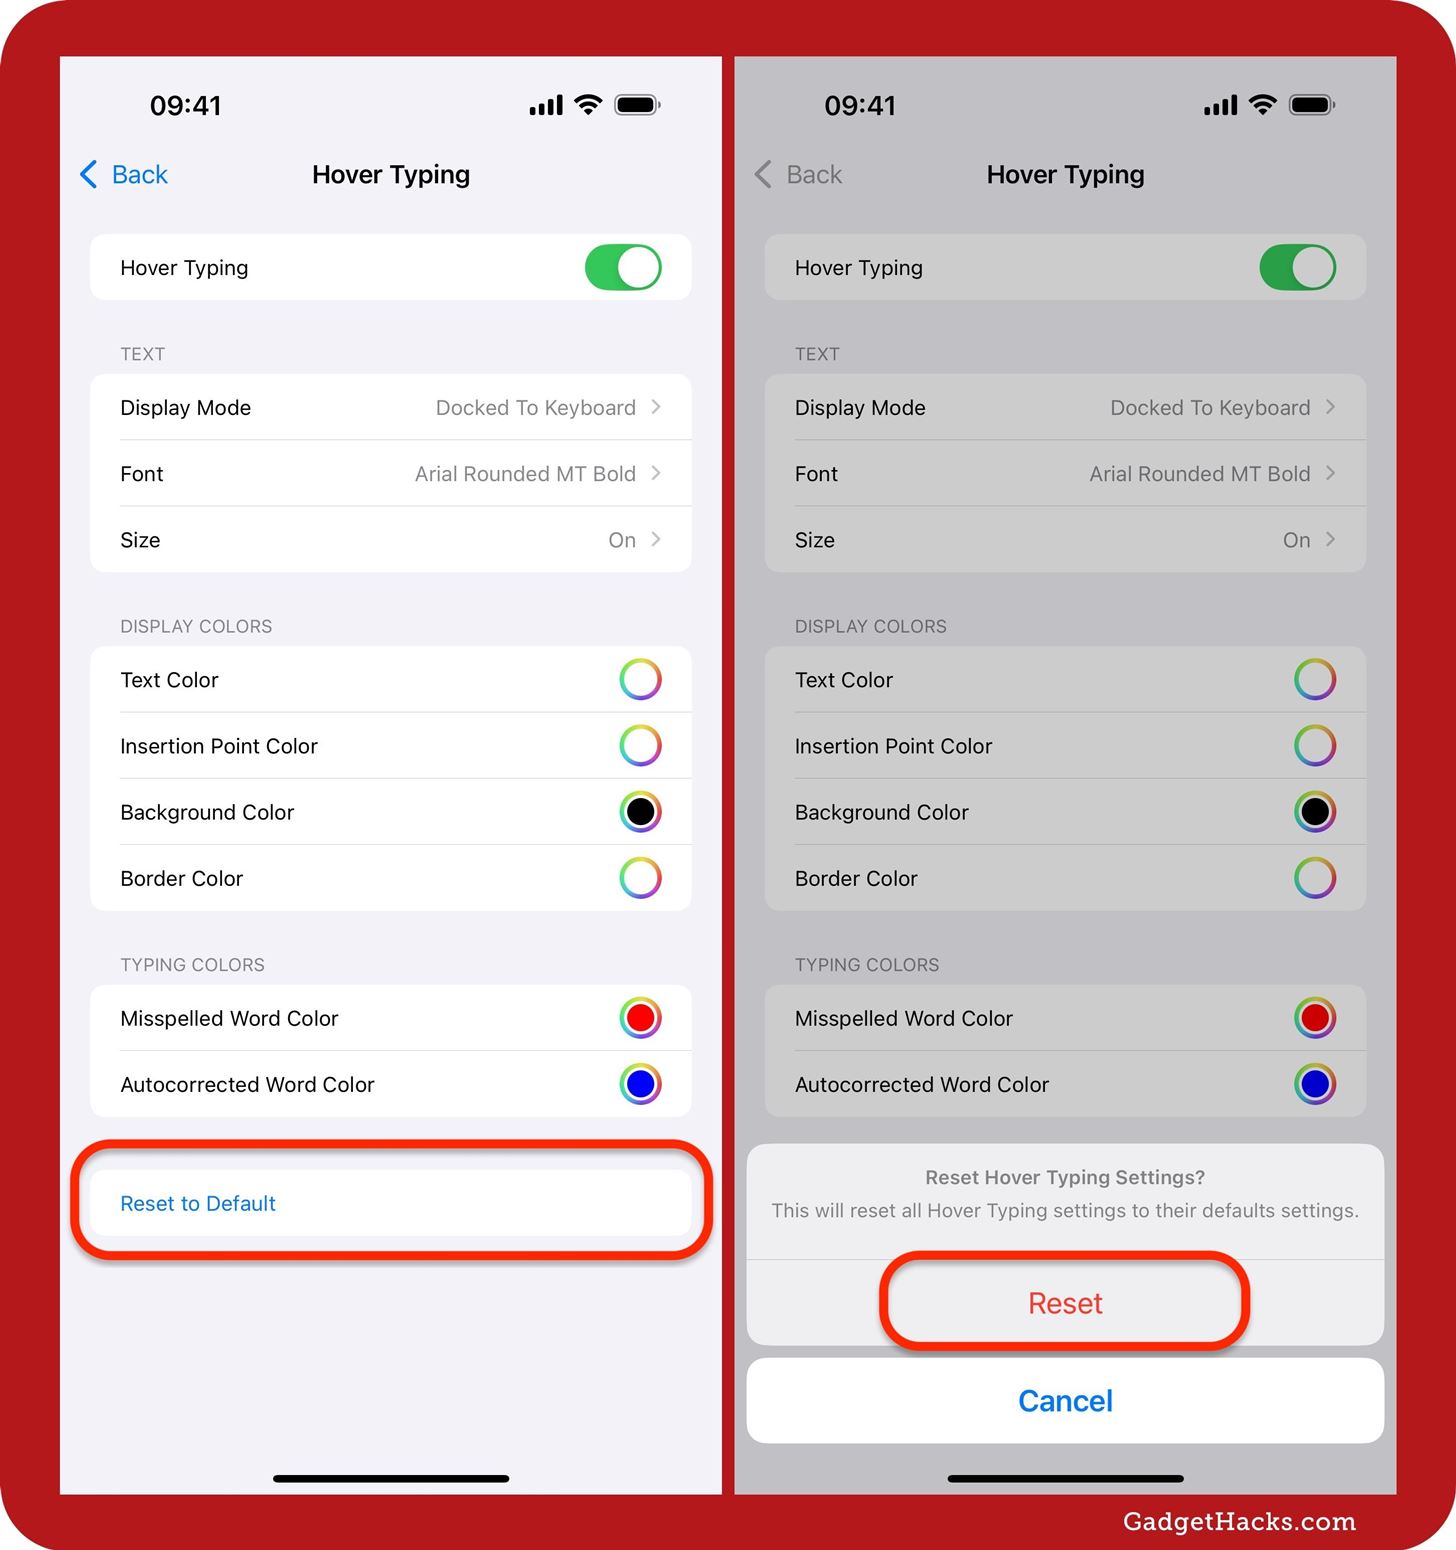
If you’re tired of your customized Hover Typing look, you can reset everything back to the defaults. Back in Hover Typing’s preferences on iOS or iPadOS, tap “Reset to Default,” then confirm with “Reset.” On macOS, select “Default” for each setting you want to reset.
Just updated your iPhone to iOS 18? You’ll find a ton of hot new features for some of your most-used Apple apps. Dive in and see for yourself:


